Showing posts with label Hot off the Desk. Show all posts

Wednesday, November 18, 2020

Shadows of Brimstone - The Ancient One

 This guy had been on my desk for the better part of a year.  I decided sometime in early 2020 that he would be my goal for Miniature Monthly Masters.  A single - large, but single - figure for the entry.

As Covid got underway, I really lost my painting mojo, and he was backburnered in favor of other projects with more instant gratification.  

Meanwhile the Ancient One continued to linger on my desk.  I tried a few things, wasn't happy.  Kept trying.  It got better.

The result was super-fast and involved a lot of airbrush blending and several sessions over the course of a weekend to apply highlights to all his wrinkley bits. 

These pictures came out a little washed out and a little dark, but they are what they are. 

He took 2nd in the Flying Frogs' Manufacturer's award.  I put him in not expecting to place (at all; when I submitted the Mfr's Award for Frogs didn't exist yet) but am happy that he was enjoyed.


Saturday, August 15, 2020

DGS Games Fist of Vidunar


I love the Freeblades models.  They're metal minis, with some classic lines/sculpts that reminds me of several different fantasy series at once. And in a good way. 

I've been working this Haradelan Fist of Vidunar off and on for several weeks (*cough*months*cough*), and currently have him at 95% or better.  Good enough to take pictures, at least.  Will go back for some editing after I've not stared at him so much.  

The base is from Scibor.  He's intended for display, not play (I have another of him for the table).  

Paints were a mix of Reaper, Monument, Liquitex (inks), Secret Weapon (weathering) and a smattering of Army Painter (washes, Matt Black).  

The Armor is True Metallic, and was an iterative process that started with dry brushing and then highlights applied by hand.  

First real attempt at freehand via the stripe on the tunic and cape.

Most basecoats were put down with the Patriot 105, the Sotar came out for close in work and final touches (like the dirt on the tunic and cape).  The bulk of the weathering/blends are 2-brush blending with semi-transparent paints and washes.

A few more pictures after the break.

Saturday, December 7, 2019

Hot of the Desk: Kingdom Death Gigalion


Harsh Kitty. Mean kitty. Little ball of teeth. Angry kitty. Hungry kitty. Kill. Kill. Kill.


I'm following a set of self-imposed color rules for my KDM set. If this is your first post in the series (see summary page), here's the part that I copy/paste:

-----
Color Choices:  For my KDM set, I'm using an airbrush to provide shadows in a pseudo-statue, almost monochrome paint scheme.  I want a lot of high contrast from light to dark, with near-black in the shadows and near-whites in the light.  I'm using warm colors (creamy grays, buttery whites, and a bright mustard yellow) for the SURVIVORS and cool colors (blue-grays and a neon blue) for the MONSTERS.
-----

I actually bought 2 of these kits at Gencon - one to assemble FAST and get on the table, and a second for a future competition piece.  This is the FAST version; as such I decided to use my old Kingdom Death recipes for colors and application.

It's pretty interesting to go back and try to replicate an old paint scheme.  It's been quite awhile since I'd painted this scheme, and I was teaching myself to airbrush when I set out with the 1.5 Core Box.  Since then, I've done dozens of other pieces and this fairly simple theme was kind of refreshing.

Sunday, November 3, 2019

Hot off the Desk: Miniature Monthly Masters 2019

Yes, I'm still here.

No, the blog's not dead.  The blog doesn't want to go in the cart.  It's feeling much better.  It feels happy, It feels happy.

Here's a quick post with my entry for the Miniature Monthly 2019 Masters.  I really hadn't planned on entering anything - before a few days ago I hadn't lifted a detail brush since Reapercon.  But then I found this Reaper Winged Cat in our Reapercon Loot bag and decided to play more with the GS World Color Shift Paints (Darth Blue).

Results are "okay."  Good enough that I entered it - just to enter something (someone has to round out the field!).  Total time investment was maybe 3 hours, including prep and priming.  Actual painting was 2 session, maybe an hour each.  I was going for a high contrast, sketch style and wanted to practice texture.  He's a very small mini to really paint "fur" on but I tried anyway.

I'm happy with the result for what it is, even if it's nearly impossible to take decent pictures of the color shift paint!


Wednesday, August 28, 2019

Hot off the Desk: DGS Games Kuzaarik Stoneclaw Savage

Dwarven calvary! Rawr!

You've already seen the finished product in the prior post.  We're headed to Reapercon this weekend so I'll set this to robo-post while I'm away.


Sunday, August 25, 2019

Display Bases 101

Ready for Reapercon. Kuzaarik Stoneclaw Savage.

One of the best things about this hobby is that it can bleed over into other parts of your hobby/interests. Whether I'm stealing techniques from my Radio Control Car and Boat past, or I'm using household materials to get something to work, it's fun for me to step outside of the accepted norms of the Miniature / Boardgame / Wargame world and bring something else to the table.

I was fortunate to have a father that was trained in carpentry.  He's had a woodshop since the early 70s, and as a kid growing up without the internet, the shop was a place to play and doodle and build things.  I don't maintain all of my father's skills, but just a little bit of it was passed on, and today I have a small glimmer of his woodshop here in my garage.  And that lets me do some fun things.

The task this weekend was to make a display base for my Reapercon entry - the Freeblades Kuzaarik Stoneclaw Savage from DGS Games..  

Tuesday, August 13, 2019

Hot off the Desk: Shadows of Brimstone Darkstone Scorpions

Angry scorpions!


In my first post-GenCon update, I think I'll do a picture dump of my Dark Stone Scorpions for Shadows of Brimstone.

This project started as a quick and dirty test of Greenstuff World's Color Shift Paint.  I originally intended just to hit the models with a basecoat, maybe highlight the eyes, and get them on the table quickly.

Sunday, July 21, 2019

Broken Token Dead Kingdom Insert

Fighting entropy, one laser cut sheet at a time.

Ok, confession time.  My copy of Kingdom Death has been pretty dusty.  What little gaming time we've committed has been Shadows of Brimstone while KDM sat unused.  Meanwhile, I've been painting more and distracted by "real life" and [insert cliche'd excuses here....].

Anyway, with other distractions, it's been months since I've had KDM out.  But, with Gencon close and a barrage of comments from Poots on the kickstarter, I've had the KDM itch again.  Last night, while rearranging some things in our gaming nook, I came across the Broken Token Dead Kingdom storage tray that I bought at PAX Unplugged 2018 but never assembled.  On a whim, I got the glue out and started assembly.

(Never ignore the fit of inspiration when it happens....).

Pictures and notes with bullet points after the break.  Bullet points are cool.

Wednesday, May 8, 2019

Hot off the Desk: Dropfleet Commander Princess Liner

Quick post for a quick project.

In between other Dropfleet shenanigans, I grabbed the Princess Liner from her package and threw her into primer.  I worked on her here and there, while other things were curing or I felt like doing something different.  Looked at her yesterday and realized I was pretty close and glued her to her peg this morning.

The Bubblegum Princess Liner

I decided to go with a "Bubblegum Princess" as sort of an inside joke.  I rattled around in my paint collection and came out with this cotton candy scheme:

  • Scale75 Cobalt Alchemy (blue)
  • Scale75 Tourmaline Alchemy (pink)
  • Scale75 Heavy Metal (silver)

These are colors I probably wouldn't otherwise use, which made it fun.

I did just a little work by hand with the Heavy Metal to better define the engines, put some AP Necromancer Cloak into a recess or two, and then it was time to ink and weather.

AP Purple Ink on the windscreens and AP Dark Tone ink on the underbelly and engines. I shot a little FW Payne's Gray ink into the engine intake using the Sotar to give it some more contour.  I dry brushed a little AP Chainmail metal on the silver after the Dark Tone cured.  Teal engine exhaust is Reaper Surf Aqua, and the engine soot is Liquitex Burnt Sienna (a little more orange than the Burnt Umber I use on my military DFC).

I like her as-is though I may go back and darken the windscreens some more.

Elapsed time is several weeks, but total time investment might be 2 hours.  Not intended for any awards, but was fun.

More pictures after the jump.

Tuesday, April 30, 2019

Hot off the Desk: Dropfleet Commander UCM Lima and New Orleans Frigates

This is a quick post, mostly pictures.

I needed to add a few more frigates to my list, so I built out the remaining two sprues (each frigate sprue builds 2 ships).  I decided on two Limas and two New Orleans.

The challenge was to match a color scheme that I'd used for the rest of my Dropfleet list - and initiated painting almost a year ago.  I got pretty close, and managed to shave some time off my efforts along the way.

Intending these results to be tabletop+, not a contest entry.  Speed and #donenotperfect.


Sunday, April 28, 2019

Hot off the Desk: Dropfleet Commander Remnant Centurion


Remnant Centurion - Battle worn, battle tested, battle ready.

The Remnant Centurion is (was?) a Dropfleet Commander ship available only at conventions and special web sales. It was most recently offered during the Adepticon (U.S.) and Salute (U.K.) 2019 shows, with the note that it would be retired thereafter. During Salute 2019, the Resistance faction was announced for Dropfleet, so I presume we'll see it - or something like it - resurface.
"Once these ships are guided to the Colonies, they are assessed for their space-worthiness. Many are barely intact rust buckets, fit only to sadly limp their way to Niccolum’s breakers yards under their own fading power. Others are surprisingly well maintained and are refitted with more modern scanner and ECM suites to join the UCMF. ... Those that have been pressed into combat duty due to the demands of the Reconquest have generally performed well and often exceptionally, especially those still captained by the same grizzled survivalists that brought them into the fold."  -- TTCombat, "The Remnant"
In the current experimental rules, the ship can fly with PHR or UCM factions.  The stats sheet lists it as a "Grand Cruiser" but in the narrative they say that this means "Heavy Cruiser" by "modern" standards.  Gameplay wise, the class has a good amount of hit points (14), good armor (saves on a 2+), and guns. Lots of guns.  This is offset by having a slower speed (7" thrust), higher signature (6"), and lower scan radius (6).

It's going to take awhile to get all the firepower where you want it, but the results should be worth the effort.

Thursday, March 28, 2019

Hot off the Desk: Dropfleet Commander Notes and Pics


This is the wrap-up post for my Dropfleet Fleet.  I am scheduling to robo-post on THURSDAY, which is the day of the big narrative battle at Adepticon.  Because there was well over a year from start to finish, my techniques (and my ability) improved as I went.  I started taking notes early (as a draft post here) to fill in the holes in my flawed memory.

This project took far (far) longer than I expected it ever would.  This gives me just under 2000 points of ships that I can put on the table, but sadly after last years' GenCon acquisitions and other leftovers, I probably have another 1000 points (maybe more) that I could assemble and paint. 

On one hand this sounds hideous - I'm glad to be done - but on the other hand I am excited to see how some of this stuff plays at Adepticon and may return fully stoked for more time in the Zoxe Shipyards.  (I think if I carved it off in 2 or 4 ships at a time, I wouldn't feel so overwhelmed....)

If you're just here for pics, scroll down.
  • ASSEMBLY:  Assembly was pretty straightforward overall.  
    • The plastic models went together well with few gaps and only minor trimming (I don't think I filled ANY of the plastic models). The only complication was making sure I was building the right configuration (all the class types/names are confusing) but I contributed to this by wanting to field a list with a lot of variety.
    • Some of the resin is pretty fragile, and I broke a few antenna as I worked. On the plus side, I had no issues with paint adhesion.
  • PRIMER:  Vallejo Surface Primer, Black, applied w/ Badger 105 and thinned with Vallejo Airbrush Thinner.  Touch up primer by hand where required (Carrier bays in particular).
  • -- BASE COLORS --
    • Airbrush (105):  Necromancer Cloak, from front at 30 to 45 deg
    • Airbrush (105):  Reaper Stormy Gray - Sides and Top
    • Airbrush (Sotar):  Reaper Misty Gray  - Nose and nacelles
    • Airbrush (Sotar):  Blue Ink aft nacelles and chin
    • Airbrush (Sotar):  AP Dark Tone - center aft
  • PANEL LINES:  Reaper Black Ink and AP Necromancer Cloak.  The bane of my existence. For the frigates, I skipped this step.  For the cruisers I did this by hand, line by line, and it really sucked.  For the capital ships, I skipped this step and instead did a coat of Reaper Black Wash, thinned 1:1.
  • ACCENT PANELS:  Reaper Misty Gray and Reaper Rusty Red (which is sadly discontinued now). The Misty Gray likes to get chalky, I tried various mitigations but ultimately lived with some surface roughness
  • SQUADRON STRIPE MASK - Tamiya 10mm gap, 2mm accent, then use the Sotar to shoot the stripe in Reaper Misty Gray
  • ENGINES:  The frigates used Reaper Smoky Silver / Gunmetal Blue wet blend.  On Cruisers and larger, I basecoated all in AP Pistol Metal.
  • -- DETAILING --  
    • GUN BARRELS:  Reaper Adamantium Black
    • Dry Brush (entire ship): AP Pistol Metal, then AP Plate Mail Metal on Launchers and vents and other silver things.
    • Liquitex Burnt Umber Ink (Sotar): Vents, blast marks, soot, and engines.  The New York got a little bit of Burnt Sienna as well
    • ENGINE EXHAUST: Reaper Mithril Silver >> AP Crystal Blue >> Mithril Silver center dot, do this fast and wet blend it (for later ships, I skipped the initial coat of Mithril Silver and it worked fine).
    • For the hanger bays on the New York, I used Liquitex Titanium White ink to light the bay, then used AP Phoenix Flames for the yellow/orange light in the same area.  (Yellow is too transparent to hold up well w/o an undercoat of white).  Then touch up dry brush w/ AP Pistol Metal.
    • The doodads on the top of the New York were dry brushed with Scale75 Necro Gold. I also used Necro Gold on the Johannesburg's nose. 

A very early shot of the cruisers. This looks like I've done the Necromancer Cloak and Stormy Gray. I found the Stormy Gray to splatter a bit with the airbrush; would try AP Uniform Gray next time 
Early shot of the New York.  Note the scale compared to paint bottles.


Early shot of the Johannesburg.

Starting to do panel lines on the Frigates. Early on, I was only going to use Misty Gray (simulating white) and added the Rusty Red on a whim.

Trying the Rusty Red.

Months elapsed between the previous picture and this one.  Here, I had just basecoated the engines in silver.


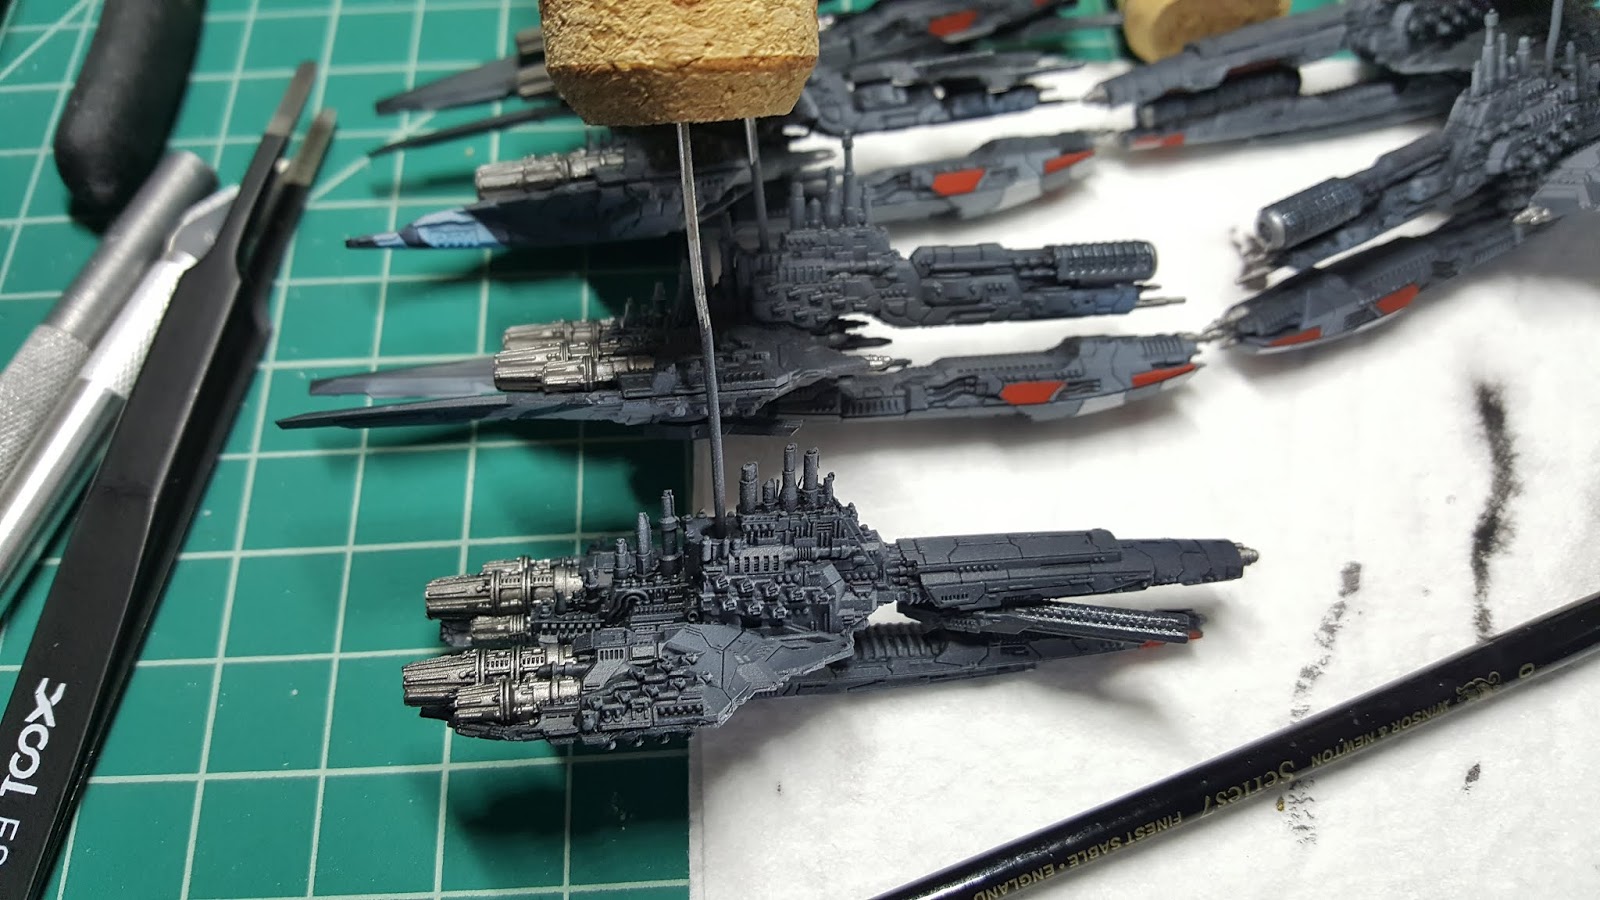
Cruisers, finished and off their corks. A few minutes later they were glued to their clear adapter peg.

Beijing class battleship, freshly striped, engines basecoated, and ready for final detailing.  I used AP Blue Tone Ink to shade the engine nacelles to give more 'pop' to the stripes.

New York and Beijing, fresh from stripes and engines basecoated.  The accent panels on these two ships are similar, but intentionally different (big ships could be built years apart and customized by their crew).

Finally, the entire Fleet - assembled together for the first time.  Front to back:  Corvettes, Frigates, Light Cruisers, Heavy Cruisers, then in the back are the two Battleships (upper left) and the Battlecruiser (upper right).

Frigates. DFC has an interesting rule in that in some scenarios not all the ships are on the board at the beginning, and are placed in later turns based on tonnage.  I have a few squads of scrappy frigates and light cruisers to jump on the board in those opening rounds.  

The Johannesburg-class battlecruiser, decent profile shot of him (though his guns are facing the other way, gah).  Directly behind him is a Moscow-class heavy cruiser.  Both of these ships are gunships, but the big J adds more missile launchers, and more HP. 
Moscow and another cruiser directly behind.  One concern I have is that the list I built is kind of a kitchen-sink build. I have a LOT of different classes of ships (so much that I'm having trouble remembering the names).  Using all of them to their full potential will probably take more skill than I have.


Various cruisers.  Upper left is my blue-striped carrier.  The cargo pod on the one in the center is used to drop ships to the surface (hence the name Dropfleet). My other ships will attempt to draw fire and die gloriously to protect this one.  In order to win, players score points by dropping armies into cities and holding them.  My list is admittedly light on Drop and will attempt to win by BSU (blowing [stuff] up). 
New York class Battleship.  Not a lot of guns but launches waves of missiles and also serves as a carrier.  I experimented with adding ambient light to random carrier bays (I lit different bays on the reverse side).  I hit her with a little more weathering; big hulls like this will have been around awhile.


The Beijing-class Battleship.  An unapologetic gunship; direct descendant of WWII heavy iron.  The two battleships will roam as a pack next Thursday, hunting for other capital ships. 
Top view.  Each battleship had a launcher that was broken when I received it.  If you look closely you can see where I attempted to simulate battle damage (hint, the New York's damage is on the passenger side nacelle, just under the vent/grate that's shaded brown, the Beijing's is on the driver side nacelle, top row of launchers).


Another shot of cruisers.

More cruisers; Moscow looking for trouble.

Comparison shot of the squadron stripes after they've been weathered and beaten up a bit.

 
Aft view. I tried to get a picture of the blue engine glows, which I'm happy with, but the lighting wouldn't cooperate.
Profile shot of the Beijing. Tried to soot up the after hull behind the engines with Liquitex Burnt Umber ink.  The underbelly of all the ships is mostly AP Necromancer Cloak simply dry brushed with AP Gun Metal.  Fast and effective. 


New York:  3/4 view showing the hanger bays.  The ships are so long it's impossible to get the entire thing in focus on my camera.
As with all things, there are always MORE things you can do.  I'm looking at these pictures now seeing additional details I could pump in.

Maybe I'll get the gumption to unbox the London-class Dreadnought (it's bigger than the New York).

Sunday, March 24, 2019

Hot off the Desk: Shadows of Brimstone Derelict Ship Broken Grates

There's probably a better name for these.

Flying Frog sells a pack of 4 resin tiles that replace cardboard tokens on the Derelict Ship expansion.

Similar to the Corpse Piles a few weeks ago, I decided to hit these quickly and see what I could do with a limited time budget.

Methods were pretty simple:

  • I'm now washing resin pieces in 70% isopropl alcohol (not soap), scrubbing lightly with a toothbrush, rinsing with water, and letting air dry overnight.
  • Primer:  Stynlez, black. Applied with airbrush.  I'm a recent convert to Stynlrez, mostly because it doesn't require thinning before airbrushing.
  • Base coat:  
    • Metal decking:  AP Gun metal (airbrushed for speed)
    • Wash:  AP Dark Tone Ink
    • Pipes: AP Dark Stone wet blended to Scale 75 Necro Gold.  This is such a great combo; super easy to blend.  Once dry, I came back with a S75 Dwarven Gold highlight and touched up some of the ribs/recesses with AP Necromancer Cloak.  The Necro gold has green/brown undertones, the Dwarven gold is brighter with some red in it; the colors aren't that far apart but the highlight pops naturally thanks to the contrasting tones.  This combo (Stone/Necro/Dwarven) has been my go-to for hoses and doodads on a few Brimstone projects now.
    • Dirt / dark areas: AP Dark Stone.
  • For a burnt look, I airbrush shaded areas with AP Purple Tone Ink, then went back over partially with Liquitex Burnt Umber.  This makes the silver look like it got hot (purple) and then got sooty.
  • AP Chainmail Metal for edge highlights on the torn metal.
  • AP Blue Tone Ink (airbrushed) for some color
  • AP Matt Black around the edges of the tile

Sprayed with AP Gun Metal Silver and then given a wash in AP Dark Tone Ink.  Here I'm basecoating pipes with a blend of AP Dark Stone and S75 Necro Gold.

First pair painted and shaded, ready for a little more edge highlighting.

Second pair.  Basecoated in AP Pistol Metal, then a quick coat of AP Dark Tone Ink.  I dry brushed the hex metal again with Pistol Metal to brighten.  Here I'm filling in the Dark Tone in the center (which is still wet!).

Shading the metal w/ Burnt Umber before basecoating the pipes/hoses.
Finished product. Total time investment is maybe 2 hrs (rounding up).  Keep it simple and on to the next.

Saturday, March 23, 2019

Happy DFC is Done Day


The past 2 or 3 weeks has been a slow ramp-up to Adepticon and finally (FINALLY!) getting my Dropfleet Fleet on the table.  And while I'd rather stage some decent photos, I wanted to say here that a few minutes ago I sat down the last brush on the last ship, and poured a whisky.  Now just I need to get the last 3 ships off their corks and glue in the base adapter, then organize and pack everything for Adepticon - which starts for us on Wednesday evening.

This has been a long project in the making.  I started assembling the bulk of this army about a year ago.  Looking back at it, the project really wasn't that bad, but a couple of the steps involved were incredibly tedious and I avoided the ships for several long spans.  I don't think being a commission painter is ever in my future.

It'll be good to have these off the bench.  I have a couple of things I want to tackle before I start my GenCon and ReaperCon projects.

Bench shot of the cruisers, fresh off their corks and before the clear base adapter peg was installed.

I carried the Squadron Stripe idea up through the battleships.  This is WIP just after I basecoated the engines but before I started any weathering or other detailing.

Two battleships, side by side. Also WIP at the same stage as above.  Each of these ships is larger than my cell phone.

Once the dust is settled, I'll try to grab some finished shots.

Sunday, January 13, 2019

Hot off the Desk: Shadows of Brimstone Corpse Pile

Finished product. Super fast, nothing too fancy.

So, last night I was rummaging around in an old Amazon box that I've repurposed for nerd storage.  I happened across the SoB plastic Corpse Pile package that I bought ... sometime? One of those things that you forgot you had.

Anyway, these pieces replace cardboard tokens that come with the Swamps of Death core box; they're basically terrain pieces that spawn zombies.

I stared at the package for a few minutes, then reached over and turned on the compressor.  These guys were getting some paint!

Total time investment is maybe 45 minutes.  Nothing too fancy.  I've seen guys spend the effort to detail all the individual bodies, paint the clothes, boots, and bits.  But there's a fair amount of smearing between distinct details; I think that a more abstract approach probably works better.  I also wanted to test some speed-painting techniques combining a few of my prior methods.

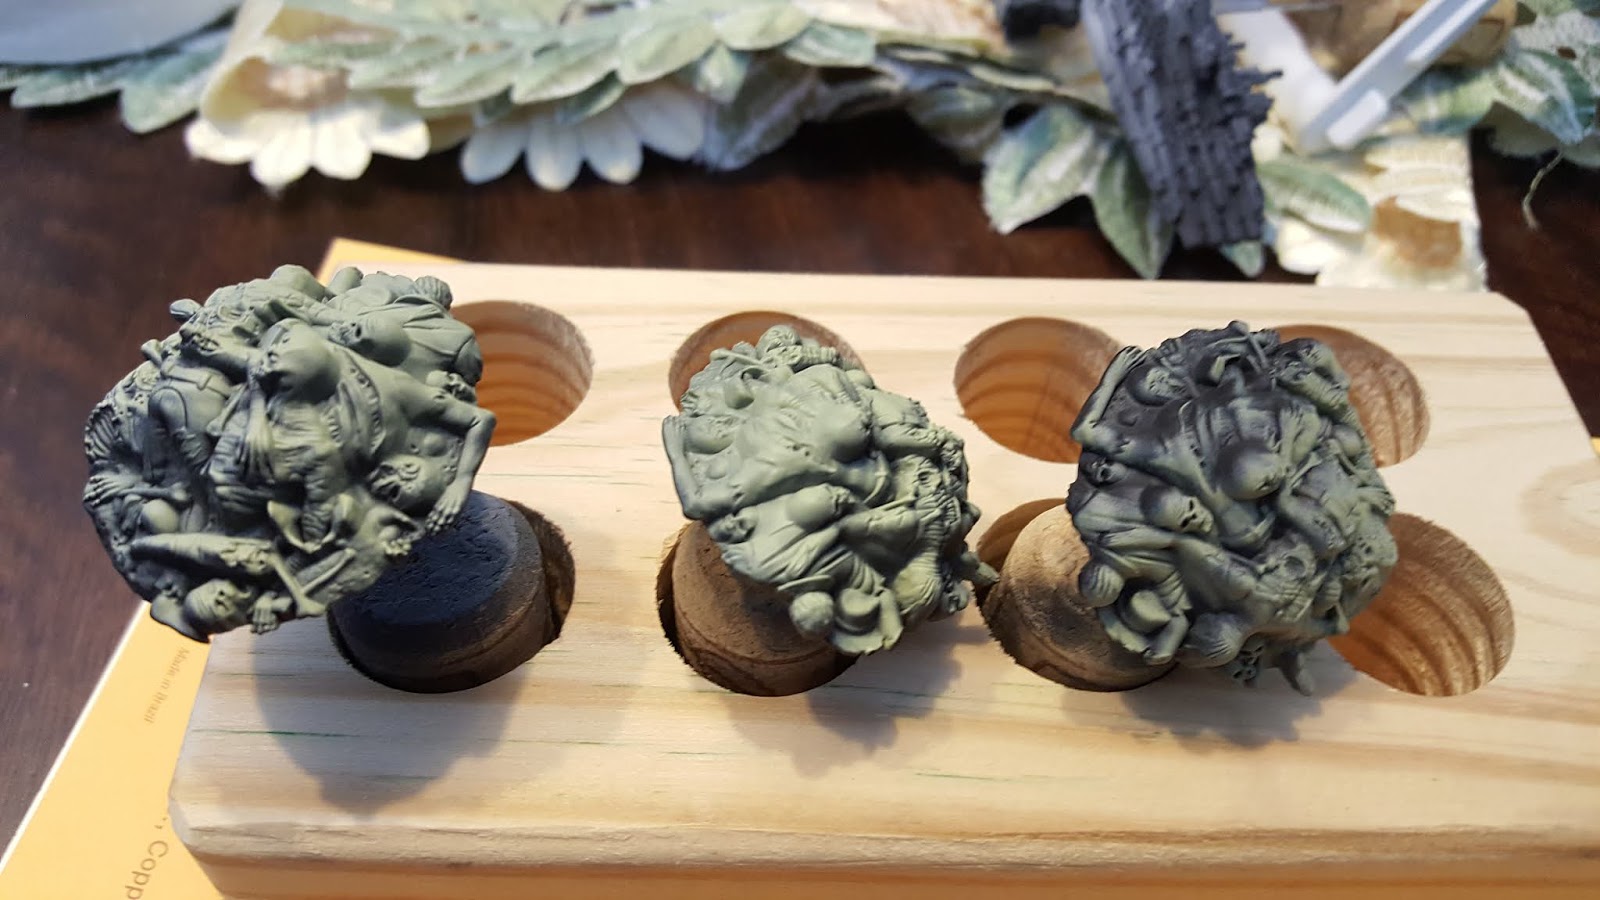
Steps 1 and 2: Stynlrez primer, followed by AP Necrotic Flesh at a 45 degree angle.

I mounted each CP to a cork and used my proprietary cork holder (aka 2x4 with holes in it) to hold them while drying.  The Stynlrez went down smoothly, and I left them overnight to dry.

First thing this morning, I hit them with some color.  ArmyPainter Necrotic Flesh is a perfect color for undead baddies.  I used the Sotar 2020 and mixed the paint fairly thin.  I held the airbrush about 45 degrees above the table and gave them a quick zenithal treatment.  This took maybe 5 minutes, including the time to mix paint and clean the airbrush, then it was time for breakfast.

Step 3:  AP Strong Tone ink applied.

Mid-morning I came back and found my bottle of AP Strong Tone ink, which is a deep brown. 

Added a few drops into a 1oz solo cup, and added a few drops of airbrush thinner (this was more for my ability to brush the result than to reduce its intensity), call it 6:1 or 6:2.  Apply the wash liberally all over, then go back and wipe away any bubbles.  Also look for areas that have pooled; wipe your brush on a paper towel and blot those away.

Walk away and let that dry.


Step 4:  dry brushing: AP Necrotic Flesh and Fang Bone.  Harsh booth light.

Late morning I came back late morning and picked up the dry brush - more Necrotic Flesh and some AP Fang Bone white to bring out some details.

Finally, I fired up the Sotar again and hit the edges with Burnt Umber all around, followed by Burnt Sienna in the brighter area (Sienna is more 'orange').  FW Payne's Gray ink (also via the Sotar) reinforced some shadows that I lost.  I did a correction pass with the dry brush and again with more Payne's gray and called it done.


Step 5:  Airbrushed inks and adjustments.  Softer bench light shown here.  Airbrushed inks (Liquitex Burnt Umber and Burnt Sienna) give the lower edges some definition and color interest.  I also (very) carefully added some shadows with FW Payne's Gray, mostly to the back side but also in the front side on a few places.
This last session was maybe half an hour total, so I think I knocked these out in about 45 minutes total time.  I may go back and put some neon green in some eye sockets, but will sleep on that.