 |
| Fighting entropy, one laser cut sheet at a time. |
Ok, confession time. My copy of Kingdom Death has been pretty dusty. What little gaming time we've committed has been
Shadows of Brimstone while KDM sat unused. Meanwhile, I've been painting more and distracted by "real life" and [
insert cliche'd excuses here....].
Anyway, with other distractions, it's been months since I've had KDM out. But, with Gencon close and a barrage of comments from
Poots on the kickstarter, I've had the KDM itch again. Last night, while rearranging some things in our gaming nook, I came across the
Broken Token Dead Kingdom storage tray that I bought at PAX Unplugged 2018 but never assembled. On a whim, I got the glue out and started assembly.
(Never ignore the fit of inspiration when it happens....).
Pictures and notes with bullet points after the break. Bullet points are cool.
 |
| Broken Token ORG080 is intended for the full 1.5 Core Box and arrives in a cardboard "pizza box." Here I've zoomed in on the label. |
ASSEMBLY:
- Assembly went well overall. There are 7 total trays (more than I expected), but after several projects I'm used to the BT assembly diagrams.
- Assembly was intuitive, though the first tray took me awhile as I navigated the frames to find parts.
- With several Broken Token kits under my belt, this was the single best execution of fit and finish I've seen from them. Most pieces went together with a satisfying snap. I did not need to shave/adjust any of the parts to get parts to line up (unlike Gloomhaven). There is just enough friction to hold the parts together while the glue set, but not so much friction that I had to use excessive force.
- I've seen complaints online about the roughness of the wood. This is standard, hobby-grade light plywood. I thought my finish was perfectly fine, though I'm not sure what people expect. It's a wood product, it's going to have some grain. If you are that concerned, a cheap palm sander and 5 minutes in the garage before you begin assembly will help.
- Other complaints were about splintering. Again, my experience was perfectly good. I used the twist and pop method and didn't "punch" the pieces straight out.
- Parts are smartly keyed so they can't be installed backwards. If things aren't lining up, don't force them - turn them around and pretend like nobody noticed.
- For assembly, I used hobby-grade wood glue from the local megamart. I had a wet paper towel in a bowl next to me for cleanup.
- Method: smear some glue on the mating pieces - not overly much.
- Smooth with finger, clean finger on the paper towel, snap the pieces together, make sure they're seated, wipe away any excess with finger, clean finger on paper towel.
- Sip beer, repeat with next piece.
- Once dry, I reinforced some of the corners with superglue.
 |
| All trays assembled and waiting for glue to cure. |
 |
| Typical BT assembly instructions, which are pretty good. I needed a large area to lay out the sheets roughly as shown so I could find stuff. |
 |
| All the frames, ready to be discarded. I'm giving you this picture because I blatantly forgot to take the 'before' shot. |
IN USE:
- Migrating to this was straightforward. I still don't have any of Wave 2 (Legacy Expansions) out of the box yet, so I'm just dealing with the core box.
- I was initially miffed that there was a gap between the upper trays. I felt like I needed 1 more token tray to make it complete. Then I realized (forehead smacking moment) that the rulebook was intended for that spot.
- Re: the above, I actually have TWO rulebooks, and they fit perfectly in the space provided. For those with just 1 rulebook, character sheets and gear grids would go in that spot.
 |
| Here's the 'before' shot. I really should be ashamed of myself. |
 |
| Test fitting the lower trays. |
 |
| The next few pictures walk through the layers - (1) Here's the view when you remove my box lid. |
 |
| (2) Remove the game board, etc. and you're at the upper layer. This is core game content only, no expansions shown. Sleeves are a mix of Paladin and 'official' Kingdom Death. |
 |
| (3) Lower layer, with room to expand. I vaguely separated things only needed at setup from things needed during a game but will continue to refine. There's a little bit of slop between the walls of the box and the trays to allow easy egress. |
 |
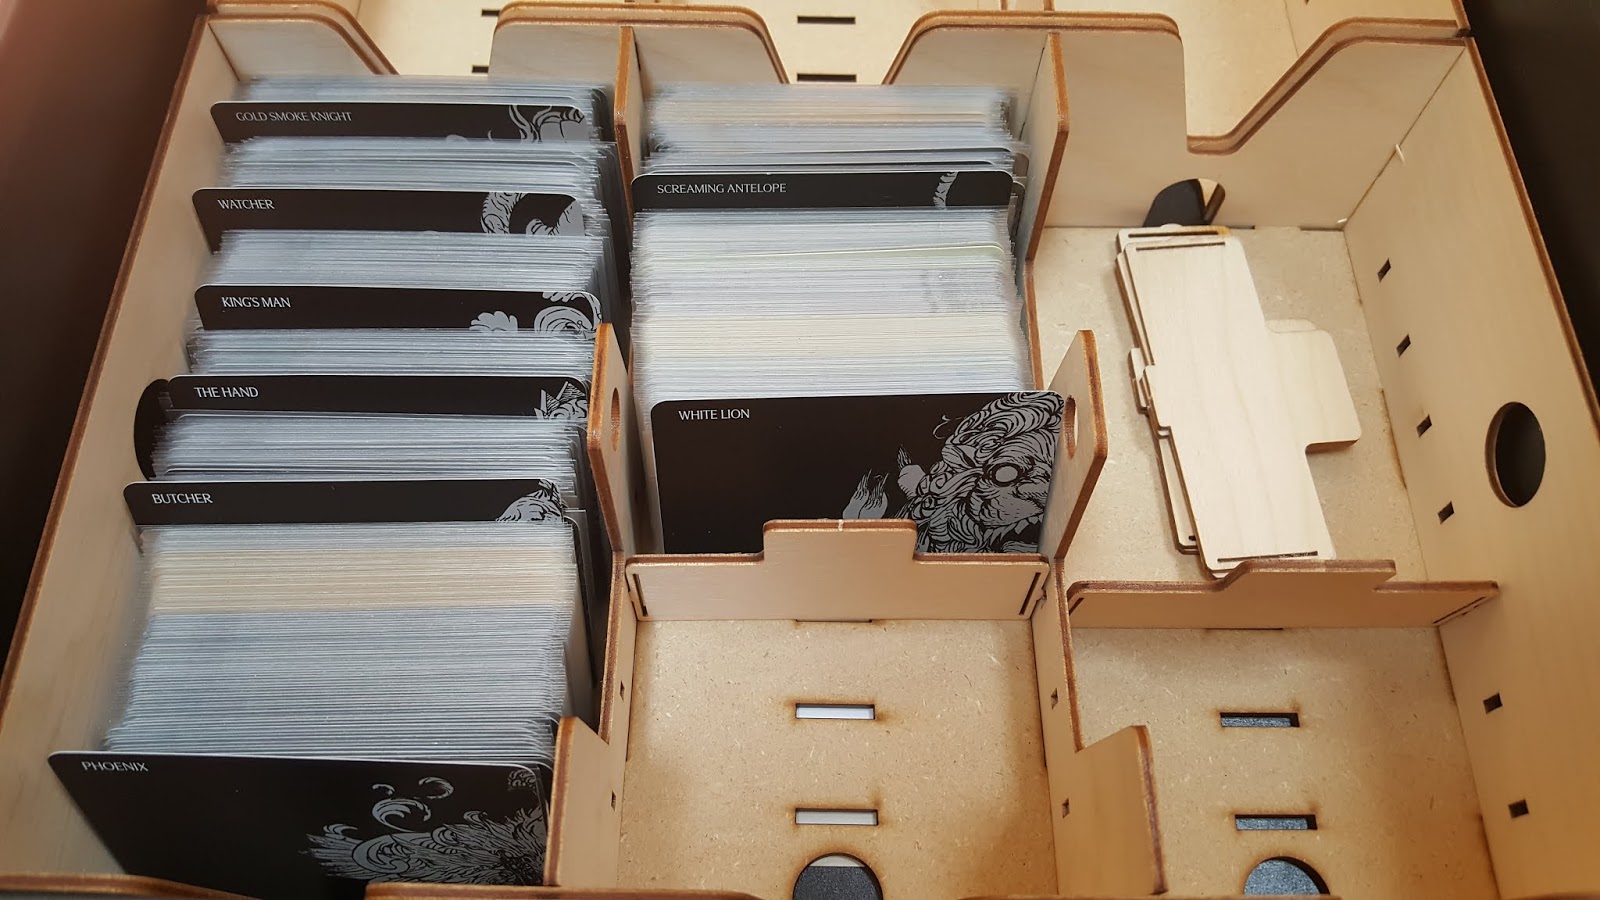
| Close up of the monster cards.Plenty of room side to side with sleeves. |
 |
| Close up of the gear cards. Time will tell if the dividers are up to the task. (If you need more dividers, BT sells extras separately.) |
 |
| I also bought - but didn't assemble - the 1.5 Expansion Box (ORG081) insert. I bought the expansion kit with my core for the 2nd rulebook and another Gold Smoke Knight figure. However, right now my expansion box is full of sprues. Eventually, I may need the space to keep Wave 3 and 4 content under control. |
FINAL NOTES:
There's something magical about
organizing things that's such a satisfying part of this hobby. Sometimes you invest a lot of money into organization and it doesn't turn out as well as you'd like. Sometimes you get done and take a deep breath and say "Oh yah, that's a helluva LOT better."
The Dead Kingdom insert is the second one. I'm pretty happy right now. But here's my closing notes:
- Note there's no minis at all in my pictures. They'll get stored elsewhere.
- Be aware that this organizer is NOT designed to fit inside the box with the thin black box that had all the sprues in it. Technically you could toss it on top, but the box lid won't close all the way.
- If you are a core-box player and don't plan to add expansion, this kit is overkill for you. While the lift-out trays are nice, most of the box is empty.
- If you are an all-in, "I just spent a mortgage payment on a friggin' board game" person then this is a great start but I think you're still going to run out of space, especially if you sleeve. Terrain cards and tokens in particular. KD: Monster is a Monster.
- Someday, I should unbox my Gorm.


No comments:
Post a Comment