This is the wrap-up post for my Dropfleet Fleet. I am scheduling to robo-post on THURSDAY, which is the day of the big narrative battle at Adepticon. Because there was well over a year from start to finish, my techniques (and my ability) improved as I went. I started taking notes early (as a draft post here) to fill in the holes in my flawed memory.
This project took far (far) longer than I expected it ever would. This gives me just under 2000 points of ships that I can put on the table, but sadly after last years' GenCon acquisitions and other leftovers, I probably have another 1000 points (maybe more) that I could assemble and paint.
On one hand this sounds hideous - I'm glad to be done - but on the other hand I am excited to see how some of this stuff plays at Adepticon and may return fully stoked for more time in the Zoxe Shipyards. (I think if I carved it off in 2 or 4 ships at a time, I wouldn't feel so overwhelmed....)
If you're just here for pics, scroll down.
- ASSEMBLY: Assembly was pretty straightforward overall.
- The plastic models went together well with few gaps and only minor trimming (I don't think I filled ANY of the plastic models). The only complication was making sure I was building the right configuration (all the class types/names are confusing) but I contributed to this by wanting to field a list with a lot of variety.
- Some of the resin is pretty fragile, and I broke a few antenna as I worked. On the plus side, I had no issues with paint adhesion.
- PRIMER: Vallejo Surface Primer, Black, applied w/ Badger 105 and thinned with Vallejo Airbrush Thinner. Touch up primer by hand where required (Carrier bays in particular).
- -- BASE COLORS --
- Airbrush (105): Necromancer Cloak, from front at 30 to 45 deg
- Airbrush (105): Reaper Stormy Gray - Sides and Top
- Airbrush (Sotar): Reaper Misty Gray - Nose and nacelles
- Airbrush (Sotar): Blue Ink aft nacelles and chin
- Airbrush (Sotar): AP Dark Tone - center aft
- PANEL LINES: Reaper Black Ink and AP Necromancer Cloak. The bane of my existence. For the frigates, I skipped this step. For the cruisers I did this by hand, line by line, and it really sucked. For the capital ships, I skipped this step and instead did a coat of Reaper Black Wash, thinned 1:1.
- ACCENT PANELS: Reaper Misty Gray and Reaper Rusty Red (which is sadly discontinued now). The Misty Gray likes to get chalky, I tried various mitigations but ultimately lived with some surface roughness
- SQUADRON STRIPE MASK - Tamiya 10mm gap, 2mm accent, then use the Sotar to shoot the stripe in Reaper Misty Gray
- ENGINES: The frigates used Reaper Smoky Silver / Gunmetal Blue wet blend. On Cruisers and larger, I basecoated all in AP Pistol Metal.
- -- DETAILING --
- GUN BARRELS: Reaper Adamantium Black
- Dry Brush (entire ship): AP Pistol Metal, then AP Plate Mail Metal on Launchers and vents and other silver things.
- Liquitex Burnt Umber Ink (Sotar): Vents, blast marks, soot, and engines. The New York got a little bit of Burnt Sienna as well
- ENGINE EXHAUST: Reaper Mithril Silver >> AP Crystal Blue >> Mithril Silver center dot, do this fast and wet blend it (for later ships, I skipped the initial coat of Mithril Silver and it worked fine).
- For the hanger bays on the New York, I used Liquitex Titanium White ink to light the bay, then used AP Phoenix Flames for the yellow/orange light in the same area. (Yellow is too transparent to hold up well w/o an undercoat of white). Then touch up dry brush w/ AP Pistol Metal.
- The doodads on the top of the New York were dry brushed with Scale75 Necro Gold. I also used Necro Gold on the Johannesburg's nose.
 |
| A very early shot of the cruisers. This looks like I've done the Necromancer Cloak and Stormy Gray. I found the Stormy Gray to splatter a bit with the airbrush; would try AP Uniform Gray next time |
 |
| Early shot of the New York. Note the scale compared to paint bottles. |
 |
| Early shot of the Johannesburg. |
 |
| Starting to do panel lines on the Frigates. Early on, I was only going to use Misty Gray (simulating white) and added the Rusty Red on a whim. |
 |
| Trying the Rusty Red. |
 |
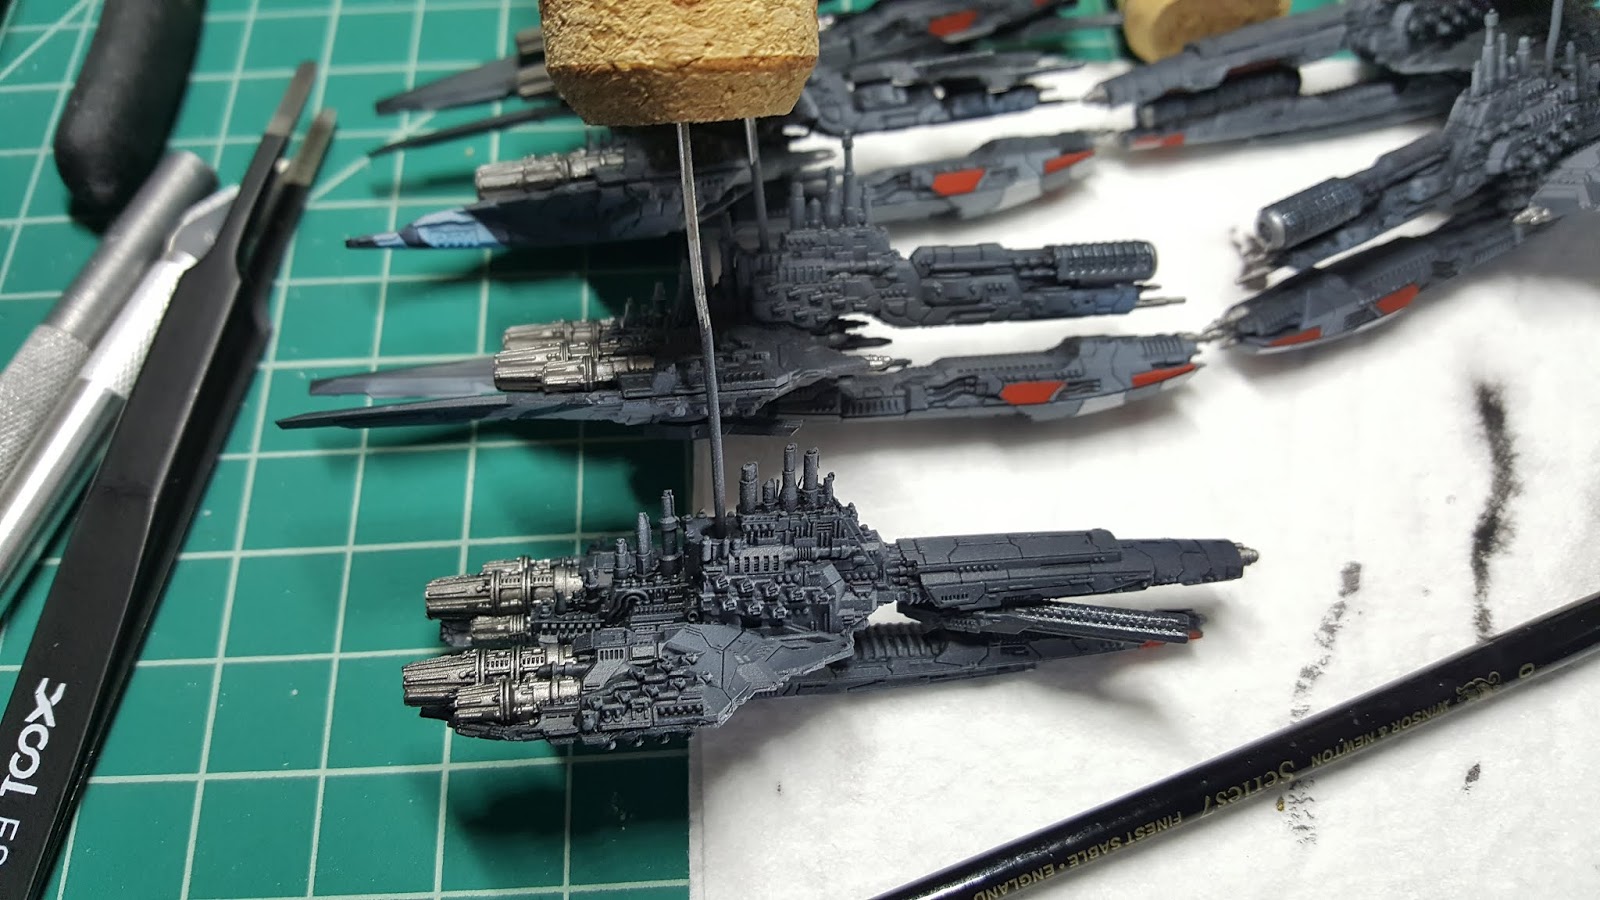
| Months elapsed between the previous picture and this one. Here, I had just basecoated the engines in silver. |
 |
| Cruisers, finished and off their corks. A few minutes later they were glued to their clear adapter peg. |
 |
| Beijing class battleship, freshly striped, engines basecoated, and ready for final detailing. I used AP Blue Tone Ink to shade the engine nacelles to give more 'pop' to the stripes. |
 |
| New York and Beijing, fresh from stripes and engines basecoated. The accent panels on these two ships are similar, but intentionally different (big ships could be built years apart and customized by their crew). |
 |
| Finally, the entire Fleet - assembled together for the first time. Front to back: Corvettes, Frigates, Light Cruisers, Heavy Cruisers, then in the back are the two Battleships (upper left) and the Battlecruiser (upper right). |
 |
| Frigates. DFC has an interesting rule in that in some scenarios not all the ships are on the board at the beginning, and are placed in later turns based on tonnage. I have a few squads of scrappy frigates and light cruisers to jump on the board in those opening rounds. |
 |
| The Johannesburg-class battlecruiser, decent profile shot of him (though his guns are facing the other way, gah). Directly behind him is a Moscow-class heavy cruiser. Both of these ships are gunships, but the big J adds more missile launchers, and more HP. |
 |
| Moscow and another cruiser directly behind. One concern I have is that the list I built is kind of a kitchen-sink build. I have a LOT of different classes of ships (so much that I'm having trouble remembering the names). Using all of them to their full potential will probably take more skill than I have. |
 |
| Various cruisers. Upper left is my blue-striped carrier. The cargo pod on the one in the center is used to drop ships to the surface (hence the name Dropfleet). My other ships will attempt to draw fire and die gloriously to protect this one. In order to win, players score points by dropping armies into cities and holding them. My list is admittedly light on Drop and will attempt to win by BSU (blowing [stuff] up). |
 |
| New York class Battleship. Not a lot of guns but launches waves of missiles and also serves as a carrier. I experimented with adding ambient light to random carrier bays (I lit different bays on the reverse side). I hit her with a little more weathering; big hulls like this will have been around awhile. |
 |
| The Beijing-class Battleship. An unapologetic gunship; direct descendant of WWII heavy iron. The two battleships will roam as a pack next Thursday, hunting for other capital ships. |
 |
| Top view. Each battleship had a launcher that was broken when I received it. If you look closely you can see where I attempted to simulate battle damage (hint, the New York's damage is on the passenger side nacelle, just under the vent/grate that's shaded brown, the Beijing's is on the driver side nacelle, top row of launchers). |
|
 |
| Another shot of cruisers. |
 |
| More cruisers; Moscow looking for trouble. |
 |
| Comparison shot of the squadron stripes after they've been weathered and beaten up a bit. |
 |
| Aft view. I tried to get a picture of the blue engine glows, which I'm happy with, but the lighting wouldn't cooperate. | |
 |
| Profile shot of the Beijing. Tried to soot up the after hull behind the engines with Liquitex Burnt Umber ink. The underbelly of all the ships is mostly AP Necromancer Cloak simply dry brushed with AP Gun Metal. Fast and effective. |
 |
| New York: 3/4 view showing the hanger bays. The ships are so long it's impossible to get the entire thing in focus on my camera. | |
As with all things, there are always MORE things you can do. I'm looking at these pictures now seeing additional details I could pump in.
Maybe I'll get the gumption to unbox the London-class Dreadnought (it's bigger than the New York).


