Showing posts with label Miniature Monthly. Show all posts

Wednesday, November 18, 2020

Shadows of Brimstone - The Ancient One

 This guy had been on my desk for the better part of a year.  I decided sometime in early 2020 that he would be my goal for Miniature Monthly Masters.  A single - large, but single - figure for the entry.

As Covid got underway, I really lost my painting mojo, and he was backburnered in favor of other projects with more instant gratification.  

Meanwhile the Ancient One continued to linger on my desk.  I tried a few things, wasn't happy.  Kept trying.  It got better.

The result was super-fast and involved a lot of airbrush blending and several sessions over the course of a weekend to apply highlights to all his wrinkley bits. 

These pictures came out a little washed out and a little dark, but they are what they are. 

He took 2nd in the Flying Frogs' Manufacturer's award.  I put him in not expecting to place (at all; when I submitted the Mfr's Award for Frogs didn't exist yet) but am happy that he was enjoyed.


Sunday, November 3, 2019

Hot off the Desk: Miniature Monthly Masters 2019

Yes, I'm still here.

No, the blog's not dead.  The blog doesn't want to go in the cart.  It's feeling much better.  It feels happy, It feels happy.

Here's a quick post with my entry for the Miniature Monthly 2019 Masters.  I really hadn't planned on entering anything - before a few days ago I hadn't lifted a detail brush since Reapercon.  But then I found this Reaper Winged Cat in our Reapercon Loot bag and decided to play more with the GS World Color Shift Paints (Darth Blue).

Results are "okay."  Good enough that I entered it - just to enter something (someone has to round out the field!).  Total time investment was maybe 3 hours, including prep and priming.  Actual painting was 2 session, maybe an hour each.  I was going for a high contrast, sketch style and wanted to practice texture.  He's a very small mini to really paint "fur" on but I tried anyway.

I'm happy with the result for what it is, even if it's nearly impossible to take decent pictures of the color shift paint!


Monday, September 10, 2018

Reapercon 2018 - Part II

Part II.  Here's the mini-review / how to.

Home sweet home. The Embassy Suites in Denton Texas was so new it smelled new.

View from our room on the 11th floor. I suspect this will be filled in with commercial offerings galore next year.

The Good:
  • The Classes.  The classes we took were excellent.  They are only an hour and 45 minutes in length, so it's fast paced and in some cases just a little too short.  We didn't take as many classes as we could because we were worried about fatigue, but we left each session excited and wanting more.
  • The People.  As I mentioned in Part I, this is a tight knit, but welcoming crew.  Reaper Staff were great, and we met so many accepting people.
  • The Venue. The new Embassy Suites was fantastic.  The staff (for the most part) were outstanding and got on board with our nerdly ways - for example, I saw employees wearing convention badge ribbons under their Embassy Suites badges.
The Bad:
  • The GrowTix registration site is ... well, I started to type "not adequate" to be polite, but ... it's trash.  Sorry.  All of our tickets came out in the end, so no harm to us, but I was meticulous in figuring out their systems and double checking everything because the interface is so horrendously bad.
  • The Auction.  Throughout the event, you can earn "Reaper Bucks" (play money) to use at the closing ceremony auction.  All in all we had fun, and even won a Badger Krome airbrush, but as tables started pooling their funds, it left out a lot of people who wanted to bid on items.  We were at a good table - thanks to getting adopted - but it was apparent that some people were frustrated.
Things to Do Differently Next Time:
  • Pack a lunch.  We ate restaurant food and junky snacks from the time that we left on Tuesday until we got home late Monday.  It's hard to leave the venue, get food, and get back in a reasonable amount of time, despite a lot of nearby options.  Each room had a kitchenette that we could have made use of - even if it was PBJ or deli meat sandwiches.  And we spent a lot of money on food.
  • Take more classes.  I don't want to spend every waking moment in class, but we could have handled more classroom time.
  • Volunteer to run a game.  There wasn't a lot of board game / tabletop wargame options.  Reaper obviously only offers what people are willing to run.  Maybe I should step up - I'm thinking Shadows of Brimstone would be a fun thing to run.
  • Enter the painting contest.  We pushed ourselves to get entries into GenCon and then the Miniature Monthly Masters.  I had things that I'd painted earlier this year, but didn't feel that they showed my current capability and left them at home.  I should have done SOMETHING though.
  • Bring stuff to paint.  Although we painted in classes and did the painting events ("Sophie Says") I could have brought a few models to play with at Fort Wappel.

Sunday, September 9, 2018

Reapercon 2018 - Part I

Miniatures. Gaming. Fun.  That about sums it up.

I've started typing this post a few times to consolidate some of my Reapercon thoughts.  Nothing I've written yet really conveys exactly what happened to us.  "We had a great/wonderful/excellent/terrific time" is kind of cliche.

So, I'll start with a post I wrote for another forum and then modify/merge and turn this into sort of a mini-review / how-to at the end.

We signed up not really knowing what to expect.  What we found is that Reapercon is first and foremost about the painting aspect of the hobby.  Secondarily, it's about D&D and a smattering of other tabletop systems.  I saw just a handful of board games in play, but there were tons of tabletop RPGs.

But painting, lots of painting.

The Trip:

Anyway, we opted to drive. People called us crazy, but I really wanted the "road trip" feel to our experience.  And I really detest airports.  Between our home and the Texas destination there were a couple of states that I've never physically been to, except perhaps during a layover for a flight.  And I really detest airports.  Did I mention I don't like airports?

We set out after work on Tuesday evening and set our destination for St. Louis and the physical store for Miniature Market.  I've used MM over the past several years as a source for all kinds of things, and it was super fun (and a little surreal) to park our car in the front row beneath the MM sign.

The store was really cool, and I would recommend stopping by if you are in the area, but wasn't a mega-mart by any stretch.  Huge for a gaming store, and well stocked, but much of the obscure stuff that I know they have is managed out of the warehouse - which is a separate address.  We bought a few things and chatted up the store staff - they seemed impressed and honored that we made them part of our road trip.

Initial Destination:  Miniature Market physical store in St. Louis.

We arrived in time for the Wednesday night pizza party to kick off the event.  We randomly sat next to other people from the Reaper forums, and that served as a gateway to meeting many (many) more people throughout the weekend.

We signed up for 3 classes spread throughout the weekend (more on this later), registered for a run-thru of the Pathfinder 2E scenario, and we did the Reaper factory tour.  All of this was good fun and quite worthwhile.

Aaron Lovejoy giving a class on NMM.

My rough NMM attempt in the limited time we had; focusing on lighting and colors.

Setting up for the "Everything Chibi" course.  Here I've basecoated the Reaper figure.

The factory tour, in particular, was fantastic.  Reaper is a small shop in the grand scheme, and it's apparent that they've grown very organically over the years and figured out what works best for them.  I've been in/around large and small manufacturing since my first job in my teens and the sad/sterile/lifeless corporate factory is far too common.  Their entire factory just oozes with personalized touches and customized processes.  It made me want to work there.

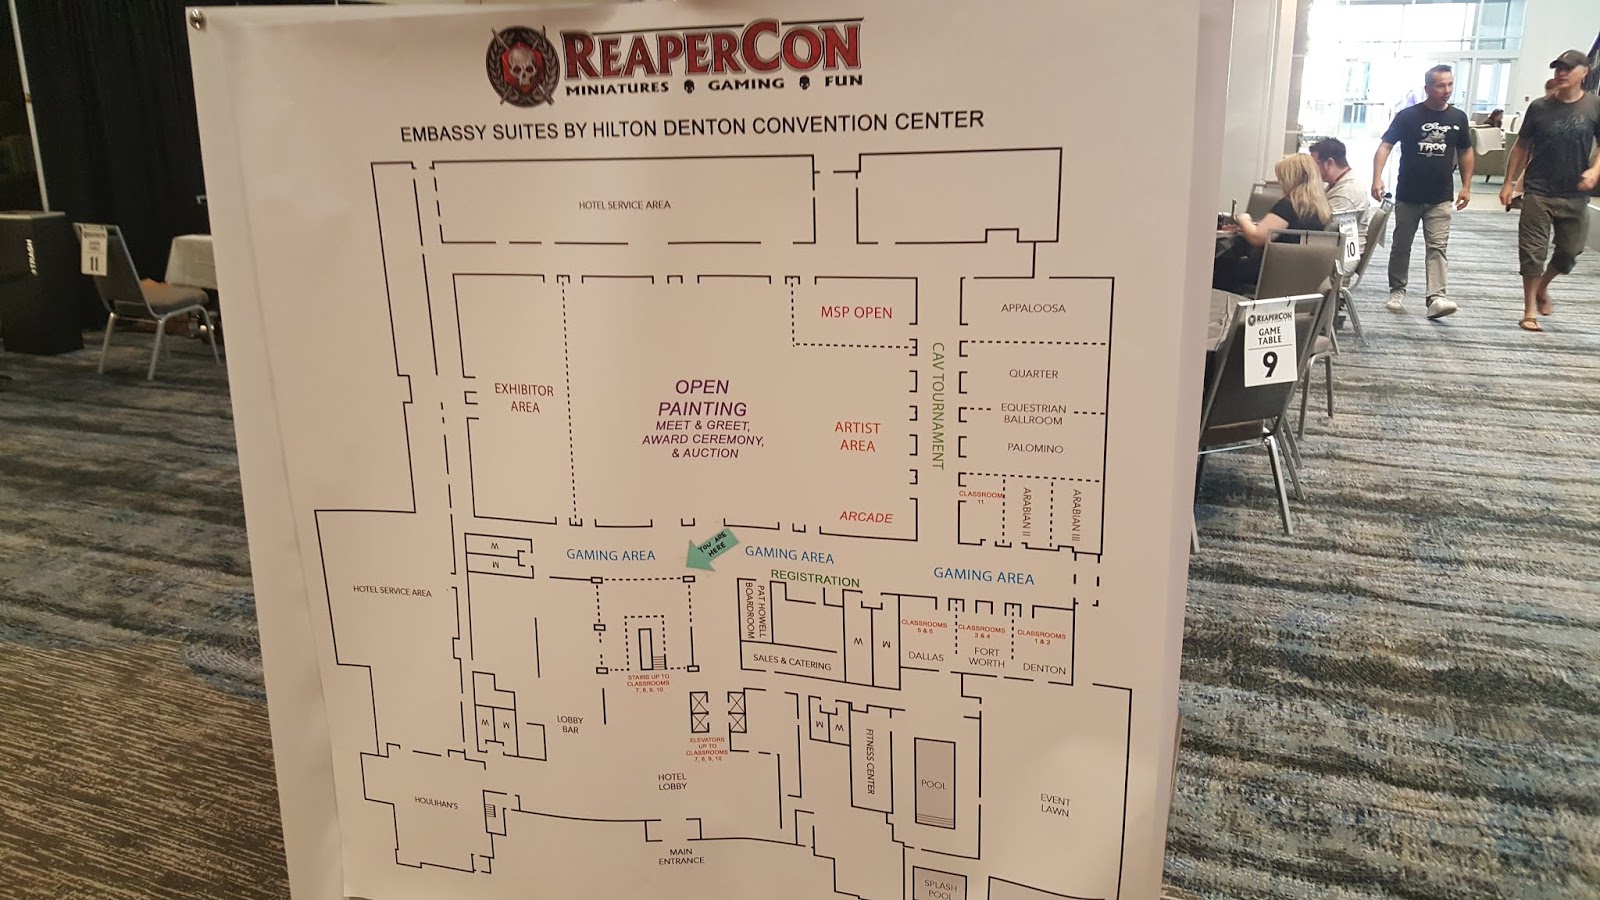
Shifting topics:  the people that attend Reapercon are a tight knit crew and quite fantastic.  It's not a "small" con, but it's far smaller than PAX-U, and it goes on for 4+ full days (with most people arriving Wednesday evening for the pre-party and some staying through to Monday morning before setting off for home, so it's almost 6 days for many).

Convention Layout. We had most of the convention space but there is room to grow.
Registration desk.

Vendor area. Two short rows of booths (this is not Gencon) but there was good variety and things worth looking at.
General 'free area' for painting, gaming, or sitting down to chat or have a bite.  I'm showing maybe 1/3 of the available space.

Here's the part that I have trouble describing:  we got adopted by two groups and then met friends-of-friends and friends-of-friends-of-friends.  After 5 Gencons, 3 Blizzcons, a PAX-U, and random visits to the game stores near us, I feel like I can find common ground and have a pleasant conversation with most nerds.  But in the small confines of a mult-day event, those incidental encounters were compounded with repeat conversations.

Fort Wappel is a gathering point for many painters and social hijinks. We spent a lot of time here.

I grabbed reference photos of this dragon for my KDM Dragon King. 

Face detail on the dragon. Those eyes!


We started Wednesday night awkward and anonymous, but went up to our room on Sunday with handshakes and hugs.  It all happened in a blur, but looking back at how the weekend evolved, it couldn't have happened any other way - and could have never been planned or premeditated.

So, we had a great time; already talking about next year.

Wednesday, September 5, 2018

Hot off the Desk: Kingdom Death White Knight


Kingdom Death White Knight on a Scibor base.

Now that the Miniature Monthly Masters entry window has closed, I'll post pictures of my entry!

*fanfare noises*  Kingdom Death White Knight!

A few random notes:
  • He was truthfully one of the best models to assemble.  The resin was super clean and easy to work with.  
  • What you're seeing is a mix of hand-brushing and airbrush work.  I alternated both methods throughout - basecoating as well as shading.
  • I started with my usual airbrush-applied primer (Vallejo Surface Primer, Black) and then worked up through several shades of gray to pure white before basecoating the other colors.
  • The marble floor result was almost totally an accident.  I bought the paint (Reaper Pearl White) to put me over the top to get free shipping when I ordered the Teal.  I started using the Pearl only because it was "new" and then realized that it's actually a "metallic" and somewhat translucent. Initially I was unhappy with it because it was thin - took several coats to cover and hard to control ... I was worried about filling in the floor texture detail.  Then the blue ink over the top really surprised me; I almost did something else entirely.
  • The stripe on the shield was masked and airbrushed, then I accented the highlights on the teal.
  • I was originally going to airbrush a bright gold ink on the shield instead of the stripe.  It would have made the shield a white with translucent gold with dark gold in the recesses.  I'm happy with the stripe but might save that idea for another figure.
  • As I was painting the two figures on the wooden cross, I was highlighting their rag coverings and discovered that there aren't 2 figures, but actually 4.  If you look closely, there's a 2nd figure on each side grasping at the other figure's waist.  They're tiny!  There isn't much lore on this figure, but I took that represent the Strong protecting the Weak and made me like him even more.


Some Work in Progress photos:

Mockup after assembly to check compatibility with the base.

First attempt at the tunic shading and gold basecoating done. Starting to highlight gold.

At this point I've mocked up the fur, but ultimately wanted it less brown to stand out from the gold more.

Raw airbrushed shield; masking and teal stripe will be applied later.


And the final submission photos:

Sword arm view.  All of the gold was basecoated and highlighted by hand (Reaper products).  The plant and some of the gems/detail and sword grip are Reaper Rusty Red - one of my new favorite colors that was recently discontinued (!!)

Rear view. The cloak was airbrushed and then highlighted by hand. I tried to accent the base with two colors of brown to make it look like silted sediment.

The base 'face' was basecoated by hand and then shaded with inks and highlighted with Reaper Pearl White. I used the Sotar 2020 for detail work.

Closer shot of the Shield.  I tried to shade the leg/thigh where maybe the (heavy) shield might rub during a long day of travel.


Saturday, June 30, 2018

Summer Sprint

GenCon badges came in the mail this week.  That's the point that August starts to feel very real.  It looks like it's going to sell out again, so I'd expect to be welcomed by this sign.

GenCon2017 greeting.  Expect it again this year.

Work was threatening to send me on business travel the week of GenCon.  I was keeping my head down and not reacting to the not-formally-announced trip, but was prepared to throw down an approved vacation slip from months and months ago and practice my best "are you kidding me?" look.  As it turns out, that trip got deferred to mid-August and the showdown was averted.

Anyway, I'm very much still in the middle of GenCon prep.  I have a few days off over the July 4th Holiday and am hoping to get the long-awaited project #1 (aka GC1) completed this weekend, then move strongly into the DropFleet Army prep for my battle at GenCon.  There is so much to do, and I paint so slowly....

But after a slow early June, I've accelerated and there is still hope.  As I was painting this week, I realized that my methods have really changed over the past year.  I've written about this before, but I happened to stumble across some Shadows of Brimstone minis that I finished just before GenCon last year, but never based and thus never declared "complete."  They're okay - certainly tabletop quality - but I kind of rolled my eyes and sighed.

I can't convey how much Miniature Monthly has changed the way that I look at the process.  

I'm nowhere near a master.  That takes practice and probably more innate talent than I have.  And I'm still using a mix of styles and methods.  For example, I don't like using a wet palette, which is heresy.  Some of the things I'm doing actually cost me time in the long run, but end up being lower risk by adding steps.  (I can jump in with both feet and risk completely ruining a model, or I can sneak up on the finish I want).  

But on the current-unnamed-project, I'm using the Airbrush to prime, basecoat, and provide initial highlights.  That's not something I was doing a year ago, but got comfortable with through KDM.  New to this project: using a Sotar 2020 airbrush to shoot inks and washes for shading.  Before the Miniature Monthly boot camp, that would have been unthinkable.

Last night I was using 2-brush blending to add a colored wash into the shadows of my current figure.  One brush to slide the wash into place, another damp/clean brush to erase the seam between colors.  Super simple, but not something I knew about until earlier this year.  I experimented with it on the KDM Watcher, and am using it full-force in the current GC1 project.

My task this afternoon is to work on the face of one of the female models.  I hate painting skin.  But I now have a decent understanding of the tools and theories I need to employ.  (That doesn't mean it'll look great, but it does mean I've got a better chance at success than I did before....).

Back to these guys ... soon. Very soon.


This is all Miniature Monthly.  Recently, I upped my tier to the top level.  This gives me a monthly 1:1 session with Aaron Lovejoy.  It's expensive and I won't keep it very long, but I needed to jump start the Dropfleet project, and he had an opening.  We did our first session last week; about an hour with him on Google Hangouts talking through the project and watching him doodle in photoshop changed reinforced some things I was already planning and changed the way I was thinking about the fine details.  An hour with him saved me hours of fussing and cussing and will speed up the entire project.  

I just need to get GC1 out of the way and shift gears to it.

Thursday, December 14, 2017

Work in Progress: KDM Gold Smoke Knight

GSK - First pass at filling the crummy neck gaps.

I still haven't taken new pictures for the King's Man or the Hand (completed this weekend with the Butcher), so I don't have a HotD post to share.  But here's a WIP progress about the KDM figure after them - the Gold Smoke Knight (GSK).

Assembly of the GSK wasn't particularly challenging from a "what do I do next?" standpoint (all the pieces fit in obvious ways), but has absolutely been the MOST challenging KDM model from a "oh crap, this really looks like ass" standpoint.

He's pretty straightforward.  In theory.  Leg/torso pieces glue to the back.  Neck inserts into torso.  Chest/belly glues to all of that.  Then arms and a few trim pieces.  The parts count is low (compared to say - the young survivor) and as a larger figure the parts are nicely scaled up compared to the other bosses.

But, something about my assembly went terribly wrong.  Dry fitting the neck/chest/arms, I realized that if I just plowed ahead I'd have some nasty gaps basically at every mating surface from the waist up.

Yuck.  YUCK!

So, after some trial and error to isolate the problem pieces, I modified the assembly order. I glued the chest piece FIRST, and then shaved the neck a bit to fit down into the resulting cavity.  This let me close the gaps at the chest piece and minimize the shoulder gaps on his right side.  This meant that alllllll of the gap transferred to his left shoulder - maybe 3/16" of nasty gaps.

At this point, my options were maybe to pin the arm and rebuild the gap with filler (which would have added complexity and looked weird), or get creative.  I spent an hour slowly shaving down the interior mating surfaces and removing almost of all of the "locating pin" geometry to get the gap down to maybe 1/64".  Visible, but fillable.

Aha, but what to fill him with?

I've had pretty mediocre results with Green Stuff and I've refused to use it on my models. (Heresy, I know!)  Lately I've been using Vallejo Plastic Putty and Vallejo Matt Varnish to blend in seams (or just choose to leave them unfilled).  This works, but takes multiple passes because the putty and varnish both shrink as they dry.  I've gotten pretty good about eliminating the ponding marks that can happen around the edges of the varnish, but this is still a fussy thing to deal with and every layer means some risk that I'll actually make things look worse.

Miniature Monthly just released a video on filling that featured Milliput, so I decided to try it.  It's still a 2-part putty (mixes like green stuff) but it thins with water so you can brush and blend the result.  I found it reasonably easy to work with, and some of the tools that MM showcased did make things a lot easier.

The picture is the "after" version that's currently curing.  I think the edges are blended smoothly, but I won't be able to tell for sure until I prime.  I can always further blend with Varnish before I airbrush colors.

I didn't take a picture of the seams in the back/cloak but think I filled them in one shot.

Tuesday, September 12, 2017

First Airbrushing Outing

Brimstone Derelict Ship Autocannons with a little zenithal highlighting.

So, I have a confession.

I've owned an aibrush kit since early May, but was too terrified to use it.  We spend a lot of time on these little army men, and in general I've taken a "baby steps" approach to it all to minimize the risk of failure.  But the airbrush represented a giant leap (at least in my mind) and therefore a giant risk.

But, I had reached a point of no return - I had some very disappointing results with ArmyPainter Matt White rattle can, and vowed to never go back.  Other AP colors have shot fine, but this one can of White hit the models like Christmas tree flock.*

So I knew I needed to take the leap and break open the airbrush kit, but have continuously put it off. I had a slew of primed models already in queue, plenty enough to keep me busy these past several months.  But now the bin is running dry, and Kingdom Death will be inbound in the next few weeks, and I really (really) wanted the Derelict Ship models on the table.

So Sunday was the day.  Despite watching several youtube videos over the past many months, I mentally prepared myself for a gigantic disaster:  hissing air hoses, backspray everywhere, a compressor that was deafening, paint everywhere but where I wanted it, drips, runs, glops, gloops and enough expletives to make my cat blush.  Predicted end result: a batch of slaughtered models that I'd need to strip and re-prime.

The actuality was ... less dramatic.  Oh, I had a few minor clogs that were easily cleared.  The dual action brush was a little clumsy for me to use.  It took FOREVER to set up and tear down.  I ended up painting my thumbnail.  Minor things.  Even at the end of this first session I was getting the hang of it all.

And the results were wonderful. My first attempt as a novice airbrusher resulted in a better finish than my best rattle can.  The details are crisp and clean, and I had far more control.  Once I got going, I actually found the experience just as relaxing as painting with a brush.  I even stretched my goals a little bit and went for some zenithal highlighting on the Autocannons even though I could have lived with all black perfectly well.

My equipment is the $80 kit on Amazon, offset with a Badger 105** brush.  I'm using Vallejo primer, and a few other bits, for the time being mostly cheap imported knockoffs.

So, I'm sure not every session will end with these glowing results, but for a first time out I'm pretty happy.

-----
*I could, and have, diagnosed the 'bad' AP experience.  They're a great brand and I support them.  But bottom line: despite controlling as many of the variables as possible, including minimizing user errors, I still got a bad finish.

**The Badger 105 acquisition was something I pursued after watching Episode 4 of Miniature Monthly.  Aaron's how-to maintenance session, and troubleshooting clogs was worth the cost of admission to the Patreon.  Upgrading to use the same brush as him was another good choice to make the videos directly "compatible" with my gear.