Monday, February 26, 2018

WIP: Dropfleet Commander Cruisers

Cruisers, ready for action. Or at least some primer.

Fast post with some pics of Dropfleet commander assembly.  I started with the Cruisers, and am building the recommended fleet composition from the 2-player starter pack.

Initial thoughts:
  • The starter boxes are plastic (not resin), with detail quality similar to KDM. 
  • Tamiya Plastic Cement works wonderfully.
  • There's near zero mold flash and only minimal mold lines.  
  • Most of the mold lines are actually cleverly hidden in the ship details.
  • Likewise, the parts are cleverly designed to disguise the the seams between parts.  In particular, the "cap" that runs down the spine of the hull and a pair of antenna at the nose hide the most prominent seams.
  • Small bits have helpful pins to locate and orient properly.
  • I'll have a few places to apply filler but overall I'm pretty happy.
Cruiser sprue. One hull is provided (center top) but other modules/bits are interchangeable to build one of 9 configurations.  The parts are numbered on the back side to keep things sane.

Moscow Class Heavy Cruiser, clipped but not yet cleaned.

First hull half. This center antenna needs to be installed before the two halves go together.  Note that the antenna has a pin/bump to properly orient it.

Center hull and antenna installed, waiting for the engine nacelles.

Three cruisers:  Seattle Strike Carrier, Berlin Cruiser, and Moscow Heavy Cruiser (clockwise, starting from left)

Alternate view showing off the Seattle's Galactica-style carrier pods, and the big friggin' gun slung under the Berlin's nose.

Saturday, February 24, 2018

Unboxing: DropFleet Commander

Finally.

Today.  Is a big day.  A day long in coming.  A day that I thought might never get here.

Today, is Dropfleet Commander Unboxing Day.  Very Exciting.

Why wait so long?
We bought the game at GenCon, but until today the shrink wrap was still intact.  We don't have a dedicated hobby room, and no basement, so we shuffle things around the house and in/out of my closet as situations dictate.  I left the shrink on the box as a way to ensure no bits got lost.  And of course, it added something to the anticipation (and shame) that I hadn't made the plunge yet.

And like anything, time got away from me.  Blink your eyes, and 6 months goes by.

Two player starter box, still in shrink wrap.

Box top open.  You're greeted by a mini-box containing the manual and other printed items.  Box is a high quality "chest" configuration and will be usable for storage after (no glued box lid).

Sprues!  Scourge Player left, UCM Player right.  A handful of D6 and a branded HAWK tape measure.

Here's the big thing about DFC - the ships are modular.  The sprues give you the parts to build several different ships from the same basic hull/backbone.

The variants have different stats lines and abilities depending on what kind of fleet you want to build - the Cruisers for example can be built to represent 9 different ships (fleet carriers, light cruisers, troopships, etc.).  The starter box comes with a recommended Fleet build that we'll start with, and then experiment down the road with lists.

UCM Sprues on display.  Three are identical, the one on bottom is unique.

The two player box includes enough sprues to build a total of 7 ships per player - 3 cruisers and 4 frigates.  We also bought the first batch of Battlefleet Boxes available anywhere, so we'll add and customize our fleets.

I should also note that Hawk Wargames recently folded into TTCombat.  So any future acquisitions will be through that company, and it looks like mass production Battlefleet Boxes are finally on the shelf.


Punch card tokens, debris fields, and one of two foldable maps.

Other items included:
  • Dropfleet Commander Rulebook.*
  • A two-piece "poster" that creates a 3x4 foot game map**
  • Cardstock debris fields
  • Cardstock cities
  • Cardstock tokens
  • Ten D6 (black)
  • Hawk branded tape measure
  • Misc stat sheets and player aids
*The rulebook is 224 pages, softback, but high quality glossy print.  It's got some heft.  There's a fair amount of backstory/fluff for the overall universe plus some details on each of the four races.  Other content includes stat lines for ships, detailed game rules, campaign creation rules, and several scenarios.  I'll want to tab mine out with post-its, but it seems reasonably well organized and well constructed.

**The maps are really cool, but they're glossy and feel like they'd be a pain to remove the creases from.  I'll play on one of my X-Wing mats to start, but I have my eyes on a Deepcut Studio Orbital Mat for future games (if I can ever justify the huge shipping costs from overseas....).

I am still debating the color scheme for my Fleet, and will be running some experiments with colors sometime soon.  But for inspiration, I've been looking at pictures of my favorite ships from EVE Online.

EVE Online - Caldari:  Inspiration for painting.


Monday, February 19, 2018

Hot off the Desk: KDM Watcher

Luke: "I don't know ... I feel like...."
Yoda: "Feel like what?"
Luke:  "Like we're being WATCHED."

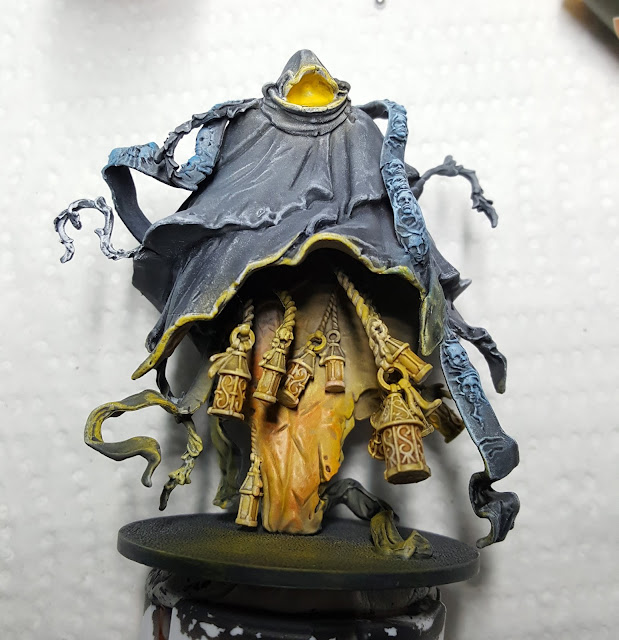
As we've gone through the HotD series for KDM, my posts have gotten longer and longer.  Let's break that trend with the Watcher.  This is the last boss in the core box, and I'm just continuing to follow my recipe.

I'm following a set of self-imposed color rules for my KDM set. If this is your first post in the series (see summary page), here's the part that I copy/paste:
-----
Color Choices:  For my KDM set, I'm using an airbrush to provide shadows in a pseudo-statue, almost monochrome paint scheme.  I want a lot of high contrast from light to dark, with near-black in the shadows and near-whites in the light.  I'm using warm colors (creamy grays, buttery whites, and a bright mustard yellow) for the SURVIVORS and cool colors (blue-grays and a neon blue) for the MONSTERS.
-----

Somewhat similar to the Phoenix, I intended to make the Watcher a "hybrid" build and use the color palette of both the Survivors and the Monsters.

I will say that the Watcher was both my least favorite to build and to paint.  It's a very cool sculpt, and I wanted to do him justice, but I also felt hindered by some of the geometry, dangly lanterns, and the way the parts fit.

Build Notes:
I promised to keep this simple.
  • I used the Official Build guide.
  • I didn't install to the base immediately. I used my pinning tools to drill a small hole in his "feet" and did most of my painting with him glued to a paperclip for access to his underbits.
  • Some of the vines and lantern ropes needed some excessive trimming to make fit, but it all worked out.
  • I filled the seam between the front and back halves with Milliput before I installed the Head and ribbony pieces that wrap around. It would have been nigh impossible to fill if he was completely assembled.
Installing the ropes and lanterns. Take your time here. 

I used Milliput to fill the seam between the front and back, BEFORE the head and ribbons were installed.  In my infinite wisdom didn't take any pictures of it.  In consolation, here's an assembled but unprimed picture.

Priming and Shading:
The main idea is to treat the inside as being lit with lanterns (coloring the same as my Survivors) and the outside with ambient light and my "monster blue glow."
  • (Airbrush) Vallejo Surface Primer, Black
  • (Airbrush) ArmyPainter Necromancer Cloak (all over)
  • (Airbrush) INSIDE - 50/50 mix of AP Necromancer Cloak and AP Skeleton Bone
  • (Airbrush) INSIDE - AP Skeleton Bone
  • (Brush) Inside Lanterns - AP Phoenix Flames
  • Pin to base
  • (Hand Brush) BASE:  Vallejo Surface Primer, Black
  • (Airbrush) BASE and touchup:  AP Necromancer Cloak
  • (Airbrush) BASE:  AP Skeleton Bone
  • Use blue painter's masking tape to mask off exposed lanterns/ropes before proceeding.
  • (Airbrush) OUTSIDE - AP Uniform Gray
  • (Airbrush) OUTSIDE - AP Gorgun Hide, from behind the his right shoulder and almost straight down
  • (Hand Brush) Outside Lanterns - AP Gorgun Hide
  • (Wash) INSIDE - AP Soft Tone Ink, thinned 5:1 with water
  • (Wash) OUTSIDE - Reaper Black Wash, thinned 2:1 with water
  • (Dry Brush) INSIDE - AP Skeleton Bone, Matt White, Lava Orange, and Phoenix Flames
  • (Dry Brush) OUTSIDE - Gorgun Hide, Matt White, and Crystal Blue
  • Base:  (Wash)  Reaper Black Wash, thinned 4:3 with water
  • Base:  (Dry Brush)  AP Uniform Gray and Phoenix Flames
  • (Hand Brush) - Lantern highlights with AP Gorgun Hide and Skeleton Bone
  • (Hand Brush) - Darkened shadows with Reaper Black Wash
Mounted on a paperclip for access to the underside.

Building highlights on the underside.

I highlighted the hooded area, but somehow totally missed the injection peg sticking straight out of his head.  This was trimmed and blended with Vallejo Matt Varnish and re-primed before the cloak highlights were built.

Spots of AP Phoenix Flames added to hood and lanterns.

Same as above, photo looking up.

Carefully using some blue painter's tape to keep the cloak highlights off the lower lanterns.  Could have also used a business card or index card.

Building highlights. AP Uniform Gray - Back

AP Uniform Gray - Front.  Shoot mostly straight down to about 45 degrees from the table.

AP Gorgun Hide - Shot mostly straight down.

Reaper Black Wash applied to the upper cloak and AP Gorgun Hide applied to lanterns.

Dry brushing and glow colors applied. Harsh desk lamp.  I wasn't entirely happy with the shadows so I blended a little more wash into the recesses, dulled the orange, and lined out the lantern frames by hand.

Finished!

Finished - Back

Other members of the Core Box cast.

Watcher and GSK for a size comparison.

And with that, the KDM Core Box is completely assembled and painted.  Oh, there are still mountains of sprues in the box that I could work on, but plan to let them sit and get some more of our campaign under our belt before I break them out.

I'm super happy with the results, though I'm definitely up against the limits of this technique - the Phoenix and Watcher in particular would have benefited from a more traditional approach instead of this airbrush-wash-drybrush routine.  But I'll take what I learned here and apply it forward.  Thanks for reading.

Saturday, February 10, 2018

Hot off the Desk: KDM Intimacy Survivors

The last of the "core" KDM Survivors.

Aha, finally! The last of the 8 "core" survivors/heroes for Kingdom Death.  After this, there are ton of sprues for the armor sets, but I'm not assembling them right now.  January and February were slow months for my painting progress, but I finally (finally!) got these off the table to complete the series of 8 survivor figures.

I'm following a set of self-imposed color rules for my KDM set. If this is your first post in the series (see summary page), here's the part that I copy/paste:
-----
Color Choices:  For my KDM set, I'm using an airbrush to provide shadows in a pseudo-statue, almost monochrome paint scheme.  I want a lot of high contrast from light to dark, with near-black in the shadows and near-whites in the light.  I'm using warm colors (creamy grays, buttery whites, and a bright mustard yellow) for the SURVIVORS and cool colors (blue-grays and a neon blue) for the MONSTERS.
-----

Assembly Notes:
  • Overall, not as difficult as Young Rachel, but both of these figures have quite a few small parts.  I followed Vibrant Lantern (Male, Female), and referenced google images, as there are no official build notes.  
  • There are quite a few mold lines through smooth areas, especially on the legs. Be careful to remove them all.  Some of them are difficult to get to after other parts are installed. You've been warned.  :) :)
  • I used Vallejo Plastic Putty and Matt Varnish to fill gaps, working in layers.  These are small areas and these products worked well.  Just blend the edges with a wet brush or you'll get ponding marks.
    • Male Survivor:  During assembly, I ended up with some gaps in the Male Survivor's jerkin/tunic/thing and at the thighs where the Z-joint was showing.  
    • Female Survivor: Gap in her hair, and across her lower back, and a scratch in her butt from mold line removal (oops).  
    • As usual, I did the best I could with filling and then hit the figures with a coat of primer to see what was visible.  Then I did a 2nd pass with the varnish to clean up before continuing.
Painting:

I wasn't looking to break any new ground here, so I just followed the same recipe as the Starting Survivors and the Young and Old Survivors.  
  • (Airbrush) Vallejo Surface Primer, Black
  • (Hand Brush)  Vallejo Surface Primer, thinned a bit, touched up a few places that are hard to get with the airbrush
  • (Airbrush) ArmyPainter Necromancer Cloak, sweep the airbrush 90 degrees from vertical to parallel with the table.
  • (Airbrush) 50/50 mix of AP Necromancer Cloak and Skeleton Bone, sweep the airbrush from vertical to about 45 degrees with the table, highlighting areas that should be brighter
  • (Airbrush) AP Skeleton Bone, mostly straight down and a few highlights
  • (Hand Brush) AP Phoenix Flames on the lantern's glass
  • (Wash) AP Soft Tone Ink, thinned about 5:1 (5 drops ink, 1 drop distilled water)
  • (Dry Brush) AP Skeleton Bone
  • (Dry Brush) AP Phoenix Flames
But you came for the time-lapse airbrush pictures, so here you go!

Assembled models, front.

Assembled models, back.

Vallejo Surface Primer, Black.

AP Necromancer Cloak. I love this color.   Sweep from above the model to parallel with the table, never "up" under the clothes/arms.

50/50 AP Necromancer Cloak and Skeleton Bone.  Sweep from vertical to about 45 degrees from the table, then start giving brightness to where the lanterns will light.  (The female doesn't have her own lantern, I'm pretending she's standing next to someone).

AP Skeleton Bone has been shot from the airbrush and I'm basecoating the lanterns.

Wash applied.

Finished models, front. Dry brush with Skeleton Bone and Phoenix Flames.

Finished models, back.

Group shot. I did get a little brighter as I worked the series. Somewhat intentional; the starting survivors start in a much darker world.

Saturday, February 3, 2018

Nerd Things: Low Investment KDM Player Aid Booklet

My low investment player aid book.  Holiday Death Dice for scale
(and because they arrived the same day).

I downloaded this really cool fan made KDM player aid from BGG several weeks ago.  Instead of just printing on our trusty old inkjet, I decided to do something a little fancy and had a spiral-bound "manual" made.

I really liked the content and organization, but the layout would have been nicer as a much smaller booklet.

I thought about spending time reformatting to make more efficient use of space.  I also thought about injecting some graphics for flavor and fun.  In the end, I decided to hit the ol' EZ button and uploaded the file intact to Staples, and for $8.43 got this nice spiral bound copy.

The print quality is great, the binding lays flat, and there's room throughout for my own notes and scribbles should I have the need.  I may do something fancier down the road, but for the time investment I'm really happy.

Five minutes of effort, under $10 invested.  Life is good.


Clear front cover protects the most often used reference.

Easy access to additional reference tables.

Plastic back cover adds some heft and stiffness.


Friday, February 2, 2018

ZPS - January 2018

Kingdom Death: Monster:  Brace for Wave 2

A couple of days late, but truth be told I stepped away from both the paint bench and the laptop and did a wholesale veg-out over the past work week.  Hoping to get a few things done this weekend, but no promises.

1. On the Table:
  • Kingdom Death: Monster.  Perpetually at the top of this list, or so it seems.  
    • At the time of this writing I am working on the last 3 figures from the Core box that I intend to assemble and paint right now - the Watcher, and the M & F Intimacy Survivors.  
    • Between work, cold weather, and a lingering case of not-quite-sick, not-quite-well, my progress has been slow.  But I'm perhaps a few days away from calling it a wrap.
    • We've played KDM a bit, but need to get more KDM play sessions under my belt as a solo-play so I can manage the rules a little better.  Maybe this week.
  • Next weekend might be the long-awaited day where I crack the DropFleet box.  We'll see. :)

2. Gaining Momentum:
  • KDM Wave 2 is loosely slated for late February, but even if it starts on time, it took me almost a month to get my Core Box and I expect similar or worse this time.
  • Rail Raiders: Infinite.  A fun little game that sits squarely on the border between "party game" and dungeon crawler.  We've played a bit, and with some house rules it feels more like a crawler.
  • PC Game:  Guild Wars 2.  I rolled a new Engineer last weekend.  A Char.  I have plenty of ways to boost her up, but just want to level her naturally and learn this class/profession a little better.

3. Losing Traction:
  • Shadows of Brimstone.  I really need to get the entirety of my collection out and get it organized, and perhaps even start a new set of characters through a campaign.
  • Gloomhaven.  I did the Broken Token organizer and wish I had more time and space to setup and play a campaign.  But if I'm going to sit down at the table, right now that means Kingdom Death.
4. Going, going, gone.
  • Nothing new to report.