 |
Luke: "I don't know ... I feel like...."
Yoda: "Feel like what?"
Luke: "Like we're being WATCHED." |
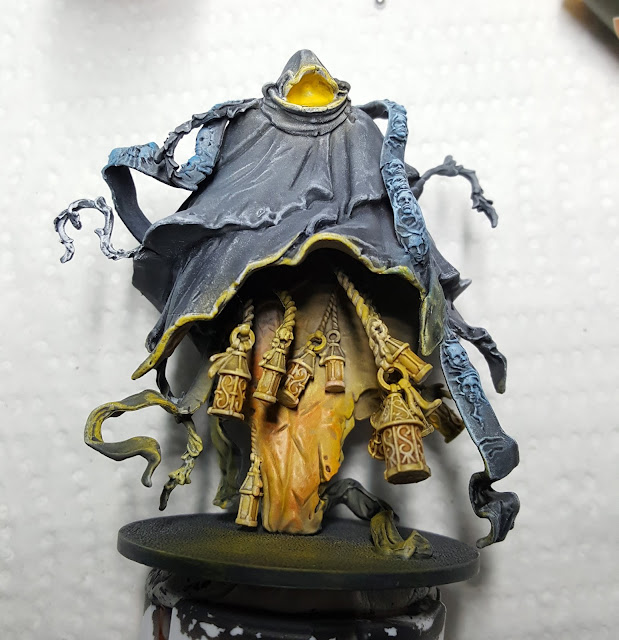
As we've gone through the HotD series for KDM, my posts have gotten longer and longer. Let's break that trend with the Watcher. This is the last boss in the core box, and I'm just continuing to follow my recipe.
I'm following a set of self-imposed color rules for my KDM set. If this is your first post in the series (see
summary page), here's the part that I copy/paste:
-----
Color Choices: For my KDM set, I'm using an airbrush to provide shadows in a pseudo-statue, almost monochrome paint scheme. I want a lot of high contrast from light to dark, with near-black in the shadows and near-whites in the light. I'm using warm colors (creamy grays, buttery whites, and a bright mustard yellow) for the SURVIVORS and cool colors (blue-grays and a neon blue) for the MONSTERS.
-----
Somewhat similar to the
Phoenix, I intended to make the Watcher a "hybrid" build and use the color palette of both the Survivors and the Monsters.
I will say that the Watcher was both my least favorite to build and to paint. It's a very cool sculpt, and I wanted to do him justice, but I also felt hindered by some of the geometry, dangly lanterns, and the way the parts fit.
Build Notes:
I promised to keep this simple.
- I used the Official Build guide.
- I didn't install to the base immediately. I used my pinning tools to drill a small hole in his "feet" and did most of my painting with him glued to a paperclip for access to his underbits.
- Some of the vines and lantern ropes needed some excessive trimming to make fit, but it all worked out.
- I filled the seam between the front and back halves with Milliput before I installed the Head and ribbony pieces that wrap around. It would have been nigh impossible to fill if he was completely assembled.
 |
| Installing the ropes and lanterns. Take your time here. |
 |
| I used Milliput to fill the seam between the front and back, BEFORE the head and ribbons were installed. In my infinite wisdom didn't take any pictures of it. In consolation, here's an assembled but unprimed picture. |
Priming and Shading:
The main idea is to treat the inside as being lit with lanterns (coloring the same as my Survivors) and the outside with ambient light and my "monster blue glow."
- (Airbrush) Vallejo Surface Primer, Black
- (Airbrush) ArmyPainter Necromancer Cloak (all over)
- (Airbrush) INSIDE - 50/50 mix of AP Necromancer Cloak and AP Skeleton Bone
- (Airbrush) INSIDE - AP Skeleton Bone
- (Brush) Inside Lanterns - AP Phoenix Flames
- Pin to base
- (Hand Brush) BASE: Vallejo Surface Primer, Black
- (Airbrush) BASE and touchup: AP Necromancer Cloak
- (Airbrush) BASE: AP Skeleton Bone
- Use blue painter's masking tape to mask off exposed lanterns/ropes before proceeding.
- (Airbrush) OUTSIDE - AP Uniform Gray
- (Airbrush) OUTSIDE - AP Gorgun Hide, from behind the his right shoulder and almost straight down
- (Hand Brush) Outside Lanterns - AP Gorgun Hide
- (Wash) INSIDE - AP Soft Tone Ink, thinned 5:1 with water
- (Wash) OUTSIDE - Reaper Black Wash, thinned 2:1 with water
- (Dry Brush) INSIDE - AP Skeleton Bone, Matt White, Lava Orange, and Phoenix Flames
- (Dry Brush) OUTSIDE - Gorgun Hide, Matt White, and Crystal Blue
- Base: (Wash) Reaper Black Wash, thinned 4:3 with water
- Base: (Dry Brush) AP Uniform Gray and Phoenix Flames
- (Hand Brush) - Lantern highlights with AP Gorgun Hide and Skeleton Bone
- (Hand Brush) - Darkened shadows with Reaper Black Wash


No comments:
Post a Comment