Thursday, November 30, 2017

ZPS - November


Another month, another Project Status Update.  This has been the month of Kingdom Death.  My core box 1.5 and the upgrade pack arrived.  The backer kit is opened again, and Poots announced the updated Wave 2 Ship Date (which I will admit is exciting but also scares the crap out of me due to the even huger volume of models this represents).  My Halloween KD webstore box arrived and I spent more money on Black Friday on KDM goods.

I did want to comment that it's been a year since I backed Kingdom Death's Kickstarter.  In some ways it feels a lot longer than that, but in others it feels like the campaign ended yesterday.  Having the core box arrive was very surreal for me; after months of staring at the models online I was suddenly staring at my own set - mixed with some disbelief that the reprint actually happened in 2017 (despite the delays, I expected the whole schedule to be pushed even further).

Anyway, let's get on with it!

1. On the Table:
  • Kingdom Death, Kingdom Death, Kingdom Death.  As predicted, the core box arrival swept everything else to the side while I dug into the mountain of sprues that constitutes a 1.5 build.
    • Prologue Survivors - Done
    • White Lion - Done
    • Screaming Antelope - Done
    • Old and Young Survivors - In Primer and Filled
    • Butcher - In Primer and Filled
    • Remainder still on the sprue.
    • Note:  Learning to airbrush on the fantastic KDM models (which are FAR superior to even the best SoB minis) has been one of the biggest joys of my hobby career.
    • Oh, and we played some KDM too. 
  • Shadows of Brimstone: Derelict Ship - I actually 'finished' the Necronauts, but I'm not happy with them and will rework when I want a break from KDM.
  • Other SoB minis mentioned last month are still in queue.
      
2. Gaining Momentum:
  • Gloomhaven.  My copy arrived a few days before PAX Unplugged. I've done a quick inventory but not played yet.  It's been completely overshadowed by holiday travels, PAX travels, and all things KDM.  I currently don't plan to paint the minis and just enjoy this as a "board game."  Crazy, I know.
  • Dropfleet Commander. I'll put this here even though the shrink wrap is still on the box.  I've been playing with the airbrush so much for KDM that I've been musing about how to paint up my UCM fleet.  I need to run some test colors if I get a chance, but the ideas are flowing.
  • This blog.  Spending the extra time to document my KDM builds will pay off down the road (I hope), if for nothing else than my own nostalgia.  But fighting blogger to build the posts, transfer images, and compose reasonable shots does take some extra time.
3. Losing Traction:
  • PC Game: Guild Wars 2.  After the Halloween Event, I kind of went on hiatus.  KDM is consuming all my spare brain cells.  
  • PC Game:  Heroes of the Storm.  I'll put this in category 3 even though I'm actually playing a bit more this month than in October.  A single match against AI is about enough time for my Tamiya cement to cure while doing KDM assembly.  :)
4. Going, going, gone.
  • Nothing new for this category.

Saturday, November 25, 2017

Hot off the Desk: KDM Screaming Antelope

Antelope: Ready for all the Empire Strikes Back Tauntaun jokes you can muster.

The Antelope has been the most straightforward KDM model to build and paint so far.  I actually started him after the Lion, but due to the filling work required to get the Lion's gaps happy, I ended up bring them through the airbrush booth together.

The build process is generally the same as the Starting Survivors and the Lion, so I won't repeat myself.

You'll notice no ears in this picture!  Oops!
Three build notes:
  1. I missed the ears on the sprue entirely. Had I not been following the build notes, I would have had a Deaf Screaming Antelope.  Thankfully I noticed before I started priming.
  2. For whatever reason, his right ear just would not go into the friggin' skull and required some excessive trimming.
  3. I took the risk and didn't pin the feet to the base. I did, however, lightly sand the mating surfaces on the back hooves to ensure a good roughed-up flat surface.  I used plenty of cement, and after it cured I (carefully!) put a fillet of cement behind the hooves to reinforce.  Time will tell if this is sufficient.  
Colors are similar to the Lion:

Vallejo Surface Primer - Black
Zenithal highlighting in 3 steps
1) ArmyPainter Necromancer Cloak
2) AP Wolf Gray
3) AP Gorgun Hide

Vallejo Surface Primer - Black

AP Necromancer Cloak

No picture of the AP Wolf Gray going down, but here's the Gorgun Hide.


Reaper Black Wash followed by dry brushing AP Gorgun Hide.

Learning my lesson from the Lion, I thinned the Reaper Black Wash about 2:1 with distilled water (10 drops of wash to 5 drops of water).  I tried it 50/50 and decided it was too thin.

Dry brushing was Gorgun Hide all over, and then a 2nd pass with AP Crystal Blue in the face and front of the body.

Finished Product, looking mighty.

Side view.

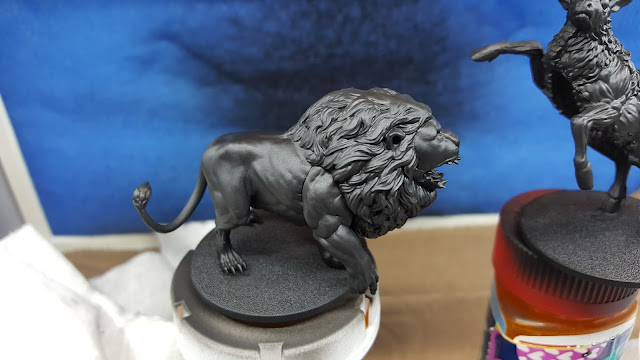
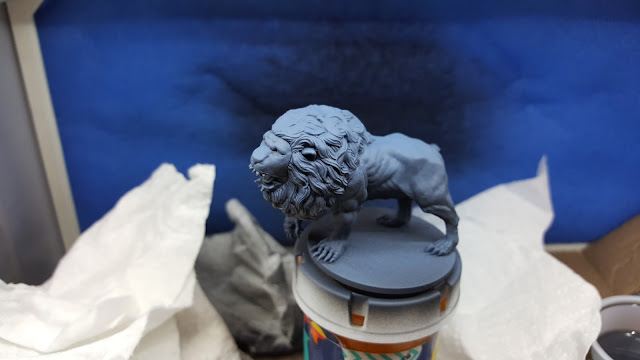
Hot off the Desk: KDM White Lion

White Lion - Ready for a punch in the nuts.
Overall process was very similar to the Starting Survivors, so I won't re-type all of that and just refer you there

I should note that I spent a lot of time trying to cover the seams along the center of the body and the tops of his hips.  I wasn't after perfection but wanted to hide them better than I normally do.

Otherwise, only the colors were different, as follows:

Vallejo Surface Primer - Black
Zenithal highlighting in 3 steps
1) ArmyPainter Necromancer Cloak
2) AP Wolf Gray
3) AP Gorgun Hide

Vallejo Black Surface Primer

AP Necromancer Cloak, shot parallel to the table and sweeping up to vertical.

Building shadows:  AP Wolf Gray from about 45 degrees to vertical.

Building shadows:  AP Gorgon Hide shooting mostly straight down.

After I sat the airbrush down, things were looking good and it was time to wash: Reaper Black Wash, unthinned

*record skipping sound*

This is where the wheels fell off.  Shame on me for using an unknown product on a flagship model without testing.  The Reaper wash is awesome but was both thicker and more opaque without any thinning compared to the AP washes I was used to.  The result was a very black lion - my careful zenithal highlights were basically gone.

In areas with a lot of texture (the hair/mane) I still got some Gorgun Hide showing through, but the smooth parts were basically painted black.  It was a very *interesting* black - it shimmered and was semi-translucent at the painting desk, but under normal table lighting it was very very dark and (to be honest) pretty blotchy in a few areas.
 
So, now what?  First boss of a several-hundred-dollar game ruined?  Not hardly.  Dealing with Bel'ial earlier this year taught me a few tricks.

I got the airbrush back out and very carefully dusted the top of the body with AP Wolf Gray.  In 30 seconds, I brightened the entire model up and covered the blotches.

Here's the mane after the wash and after some correction highlights on the back of the body.
 
Dry Brush:  Gorgun Hide.  This went well overall, but I got sloppy in a few areas. Gah, more fixing required.

Dry Brush:  AP Crystal Blue for an ethereal glow around the mane.  I did this in several passes and tried to get the blue to be more intense towards the face.  Initially I hit the face pretty hard in Blue too, but went back over it with some Gorgun Hide, leaving (mostly) just the mane blue.

Re-Wash:  I mixed the Reaper Black Wash 50/50 with distilled water and carefully blended some of the Gorgun dry brush that came out messy, and parts of the mane where there was overspray from my airbrush touch up.  I also rewashed the face to reduce its brightness and bring some of the details back out.

I didn't take pictures of all of the correction work - it progressed really quickly.  But here's the finished product.  In this light the blue looks VERY BLUE, but under other lights it looks more gray.
 
Some people would gloss over the things that gave them trouble.  Painting these little army men is not always all rainbows and unicorns.  Shit happens.

So, Mr. Lion was a little less straightforward than I'd planned, but I learned something about a new product and I'm happy with the result!  Depending on the lighting (natural sun, LED, incandescent) he's either very blue or very gray.  The Wolf Gray is an interesting color for that.
 
Warm colors for the Survivors, Cool colors for the bad guys.

Wednesday, November 22, 2017

Hot off the Desk: KDM Starting Survivors


Starting Survivors, ready for the worst.
Build Notes:
  • No particular building difficulties.  Just take your time.  I typically had BOTH vibrant lantern and the official instructions open.
  • Tamiya plastic cement used throughout.
  • Chose to use the special stone face bases.
  • Trimmed what minimal flash there was with Citadel Moldline Scraper and the back of a hobby knife.
  • I opted NOT to make every glue seam perfect, but did fill some gaps with Vallejo Matt Varnish.
  • I always wash my plastic models in warm/hot tap water and a bit of Dawn, a light scrub with a disposable toothbrush and a thorough dry.  This removes whatever mold release may be on the plastic that will make your primer angry.
Assembly mostly complete.  At this point I'm scraping mold lines and about to glue to the stone face bases.

Paint process:
The GenCon2016 "statue" models are what really brought me to KDM.  I knew from the moment that I pledged that I wanted to emulate that minimalistic stone style. 

As I looked at how others were painting their models, I drifted away from a very highly lit "ancient Rome" statue towards a dimly lit abstract statue.  I wanted a lot of contrast (i.e. a lot of very dark darks and near-white highs) almost like some comic book styles. Lastly, I'm working with the idea that my "good guys" are going to lean on warm colors while the bad guys are going to lean on cool colors.

Here's the process I used:
  1. (Airbrush) Vallejo Black Surface Primer, thinned a bit.
  2. (Airbrush) Zenithal highlighting 1 - ArmyPainter Necromancer Cloak all over.  Airbrush angle ranged from horizontal to the table and higher.  Did not shoot "up" under cloaks and overhangs, but there is always some splash.
  3. (Airbrush) Zenithal highlighting 2 - 50/50 (approx) mix of AP Necromancer Cloak and Skeleton Bone.  Airbrush angle ranged from straight down to about 45 degrees from straight down, and a bit of highlighting where the lantern light would hit.  
  4. (Airbrush) Zenithal highlighting 3 - AP Skeleton Bone almost completely straight down and more highlighting of the lantern-lit areas.
  5. Wash:  AP Soft Tone Ink all over.  Unthinned.  This made the Skeleton Bone very brown and pushed the Necromancer Cloak recesses back towards black.
  6. Dry Brush:  AP Skeleton Bone, figure and base; attempt to highlight muscles, cloth, and other details.
  7. Dry Brush:  AP Phoenix Flames, on the lantern and immediately around to give a splash of lanterny warm glow.
  8. (Airbrush) Varnish:  Vallejo Matt Varnish - 3 coats
  9. Outer bases: Vallejo Black Surface Primer, 3 coats of varnish
Fresh from primer. Horrible backlit picture.

Necromancer Cloak being applied to pull details out of the depth of pure black.

Left: The 50/50 Skeleton Bone and Necromancer Cloak mix.  Right:  AP Skeleton Bone.

Wash applied. I was initially dismayed at how BROWN everything got, but I was able to bring the highlights back up with Skeleton Bone dry brushing.

Finished product; dry brushed with AP Skeleton Bone and lantern glow via AP Phoenix Flames.

Reverse view. I'm most happy with how the cloth and the hair came out.


I really don't have a lot of time invested in this method.  Priming with the airbrush takes longer than rattle can, but gives a far more controlled result. After letting the primer cure 24 hours, the Zenithal highlighting was basically done in one sitting.

The biggest time sinks are the cleanup of the airbrush and playing around with thinner to make the non-airbrush paint shootable through the brush.  

Tuesday, November 21, 2017

PAX Unplugged: The Aftermath

The welcome banner coming from the Marriot, over the Queue Area.

We just finished our PAX Unplugged survey, so thought I'd finish my rundown here.

We went to PAX with few expectations.  Grabbing tickets was more of an excuse for a road trip than anything.  We had few distinct plans.  We had never been to Philadelphia and didn't know our way around the downtown. 

We set out Thursday after work, and drove until we didn't feel like driving.  I found a hotel on my phone an hour ahead of us and made a reservation.  We checked in, watched a bit of The Day After Tomorrow on cable, and then crashed out for several hours of shuteye.  I didn't set an alarm, and we slept in a bit.  Free breakfast and a horrible cup of lobby coffee later, we were on the road again.

We arrived at the Hampton Inn on Race Street, but our room wasn't ready (we were early), so we parked the car and grabbed our badges and attempted to enter PAX.  It was a little after 1pm, and based on Gencon and Blizzcon, I was expecting to navigate by following the crowds.  Turns out, there weren't any, so we walked most of the way around the convention center before we found the actual PAX entrance.

PAX itself was great. We spent most of our time in the Vendor Hall or just meandering around.  We met many people, had some really good conversations about random things, and spent time with some of our favorite vendors.  PAX got a lot of things right, and a few things could have been better, but it's the people that will bring us back next year. 

We bought more than we expected - a lot of paint from Reaper and the War Store, and a few Christmas presents for each other. 

We demo'd several games - both direct play and "over the shoulder demo" - though I came away most impressed with Root.  The art is great and the gameplay was fun, and I decided to support such things and backed the kickstarter.

If I was to complain about anything, it was the scheduling of events and activities.  I really prefer the Gencon method of pre-scheduling all events - this lets you plan your weekend a little more closely.  It wasn't always clear how to participate or even what was going on in each room.  You really had to be persistent and find an Enforcer for clarification, which is less than optimal.

We opted to drive home Sunday and avoid burning more vacation time.  This meant a very early start and most people in the hotel lobby were there for the Philadelphia Marathon.  We were aware of the potential for road closures, but really had no idea how extensive they would be or that they'd be active at 6am.  Leaving the hotel to navigate to the interstate in the dark, in the rain, with lots of cops and flashing lights, in an unfamiliar city was very stressful.

But after that, the drive was light on traffic and we made outstandingly good time.  We even got to see some very pretty snow in the mountains and moved through it before the roads were coated.

Random bullet points:

  • Our stay at the Hampton Inn was great, but next year I'll try to get in the Marriott since it connects directly via the Skybridge.  We got caught in the rain (thankfully not a downpour) and the Hampton seemed to be on the wrong side of the venue and away from most food options.
  • Random banter with random people really made the event, especially over beers in the hotel bar.
  • Reading Terminal Market was an awesome find.  
  • Parking was horrible, and expensive, but compared to the price of an airline ticket we of course did okay.
  • Note above where I said 'next year' ... yes, already talking about a return trip in 2018.

Sunday, November 19, 2017

PAX Unplugged Day 2

Far end of the gaming/tourney area. One opening to the main stage is at the left of this view. The vendor booths are at the veeeeeery end of this large hall. 

I take back everything I said about PAX unplugged and the ability to walk up to anything. :)  After a fairly quiet Friday, the crowds surged on Saturday, and the venue was far more crowded.  The far end of the vendor hall [nearest Wyrmwood] cleared out a bit after lunch, but at various choke points the show floor was almost full gridlock.

This is a good thing. It is a good show.  People we talked to were happy, and the mood was very positive. 

Although the show continues today, our part is done and we'll begin the haul back to reality in a few minutes.  I'll be back with a more thorough run down of my thoughts... but for now: goodbye PAX!

Edit: Clarity and formatting now that we're home and I have a real keyboard.

Saturday, November 18, 2017

PAX Unplugged

We went to the RIGHT!

Hello from PAX Unplugged!

This is the inaugural show from the Penny Arcade gang devoted only to board games and tabletop held in downtown Philadelphia. Day 1 wrapped, and I'm up early on Day 2 so thought I would type a quick trip entry.

We signed up for the event not knowing exactly what it would include. We have not been to any of the other PAX events, and as the first year we weren't sure what they could pull off.  We also learned that this the same weekend as BGG con in Texas, so weren't sure how many of the big names would make the trip here.

Turns out the U.S. is big enough for two nerd conventions at the same time. Yay.

We started driving Thursday after work. With stops, we had a 12 hr trek but decided to split that up on the inbound leg.  We got up yesterday at a random hotel we found on my phone while driving, had breakfast, and then enjoyed a glorious fall morning of driving across Pennsylvania.

We got in yesterday perhaps a little later than I expected but were still heading to the show floor around 1pm. We walked the expo hall and gawked at some of the tournament play.  Dog Might Games was one of the main stops we wanted to make, and we had a nice visit with our favorite lumberjacks and got caught up on their kickstarter progress.  We then found the paint and take area sponsored by Ninja Division, and had a hour or so of quiet painting time.  This also got us some time to chat with John, the ND owner/boss, who we've met at past Gencons.

When we wrapped up there, we were starved so we got back to the hotel and got checked in.  We walked up to a place called the Prohibition Taproom, and had some amazing comfort food and local beer. It was busy on a Friday night, but was out of the way enough that it was all locals and few PAXers. I feel a little more hipster this morning after hanging out with that crowd.
So far, we have a favorable view of the event. Some of the attendees are the PAX devout. Some are like us and are here because we're board gamers. Everyone is friendly and dialog and banter is easy. The venue is perhaps 1/2 to 1/3 the size of Gencon (at least the main portion of Gencon in the convention center). There isn't the same flash and awe as Gencon - the big name booths like Fantasy Flight, CMON, Privateer Press are far smaller and less glitzy. There aren't any show exclusive figures to track down, and no new product announcements to be buzzing about.  That maybe sounds like criticism but isn't.

There's a good crowd. There is a lot to see and do. But the layout and size are such that there's not the crush of bodies and you can get in and see what you want to see. There is more room to demo. And there are some smaller names here that aren't at Gencon, so we're seeing new things and meeting new people.

For today, we'll be moving in a little while. Reaper has a good booth and I want to get some of their paint to take home. We'll visit Dog Might again, and maybe find a game or three to demo. If we can get in, Shut Up and Sit Down is the keynote speaker today on the main stage and I'd love to see them live.

Friday, November 10, 2017

Kingdom Death: Monster - The Unboxing

Death awaits you all, with nasty big pointy teeth!

So, today was the day.  I happened to be at home and met the FedEx guy at the door with a smile.

Honestly, after all the waiting over the past 11 months, it's a little surreal.

The captions below tell the story.  At the time I'm writing, the White Lion is assembled minus the feet, and then I'll start putting the starting survivors together.


The box was dirty, but overall in good shape with conveyor belt damage and scuffs. No punctures or stabs.
Inside the cardboard is about a half inch of Styrofoam.  The light brown cardstock is to protect against overzealous cutting of the packing tape - a super nice touch.  There is a matching piece on the bottom.
The Monster.  Box arrived in good shape.
Had to get the 1.5.  The scuffs on the corner are more of a dry spot in the matte black and not actual damage.
Cover off.  You're greeted with a box of sprues.
Diving deeper. All of the components are individually packed. 
Hard to see, but there are some thin spots in the tray. Not shipping damage, they just appear to be molded thinly due to the vaccu-formed manufacturing process.  Imperfect but doesn't detract.
Let the assembly begin!

The sprue box is truly intimidating.  Opening the box caused me to giggle, then I pulled up a corner -- except where the Phoenix sprues are in the center, they are stacked 4 high.  There's nothing like picking up a slab of unassembled models.

I'm not going to go through each and every sprue - Vibrant Lantern does a much better job of that than I could.

I also got my Upgrade box last week. I peeked inside the box to ensure no damage but otherwise have left it sit to avoid spoilers.  With the Core box here, I'll delve deeper.

Good luck with your own assembly, and may your dice roll high.

Thursday, November 9, 2017

Full Nerd Saturation

This is the poor UPS man carrying all the boxes to my door.

It's been a good 24 hours.

Yesterday, the Mighty Dice Pledge Manager opened, so I got to geek out about wood and dice selection for my pledge.  (For the record, that's 2x Bolivian Rosewood and one set of Galaxy dice and one set of Glacier).

On top of that ... as of a few minutes ago, I have my Gloomhaven shipping notice.  It looks like it's a real box that's actually in transit and not just a shipping label creation.

On top of THAT ... after almost of a month of Kingdom Death fulfillment, as of a few hours ago I can finally see that my core box is moving and will arrive tomorrow.  TOMORROW!

AND ON TOP OF THAT ... my KDM Halloween Web Store order shipped today. 

Most of this in the past 2-3 hrs. 

I'm currently at full nerd saturation.

Wednesday, November 1, 2017

Zoxe's Getting Started Guide

Just the Basics

With Kingdom Death shipping, the ol' internet has been full of people coming forward to ask about assembly and painting basics.

This is my attempt to take some of the scary out.

To get started with assembly, you really only need a few things.  You can buy a pre-packaged kit at the Friendly Local Game Store (FLGS) that's "branded" towards miniatures/wargaming.  That's certainly a viable way to go - I don't fault anyone for wanting a turnkey solution.  But of course, you can also assemble your own kit, and maybe save a few bucks.

(After the KDM campaign, saving a few bucks might be something we all need. Hah.)

Disclaimer:  This post is a mix of how I got started, tools I currently use, and my opinions on the subject matter.  I'm not a pro modeler, and your goals may be very different than mine.

I got started with miniature assembly and painting after GenCon2015, where I bought Shadows of Brimstone on a whim.  I bought the game not really expecting to do much "modeling" and just wanted to play the game.  What I found, however, was that I actually enjoyed the assembly/painting aspect of the hobby as much as playing the game itself.  Since then, I've spent far more time than I intended working through my ever-present SoB backlog.

But here's what I recommend if you're just getting started....

I.  Beginner Tools

I considered doing a turnkey kit, but I've been doing radio controlled models since I was in junior high. I already had a wide variety of hobby tools already available in my garage, so I raided that loot and filled in the remaining blanks.

Here's my thoughts on the bare essentials:
  • Work surface.  If you're careful, this can be some old newspapers on the kitchen table.
  • Sprue Clippers. Any small side cutters will technically do the job.  The blue handled Xuron that I currently use were cheap on Amazon.  
  • Hobby Knife.  My handle is perhaps 30 years old, but still works well with a fresh blade.
  • Extra Hobby Knife Blades.  Most people use the triangular tip #11 style.  Available at the game store, but cheaper at places like Hobby Lobby and Walmart.
  • Plastic Cement.  This type of 'glue' is intended for plastic models.  It uses a solvent to actually melt the soft plastic of some miniatures to weld the parts together.  The choice of brand and style can sometimes be hotly contested, but here's my recommendation:  Tamiya Plastic Cement.  It's thin and flows well, and has a brush in the cap that provides exceptional control in both amount and placement.
  • Superglue.  Loc-tite brand is shown in the header image, but most brands will do the job.  Generally intended for resin models (plastic cement does NOT work for resin) but can be used for plastic models if you prefer.
     
  • Optional: Small file set.  This is usually listed as "must have" on most beginner lists, but I truly don't use them all that often.  My set came from Harbor Freight almost 20 years ago.
  • Optional: Fine sandpaper.  I use this more than the files.  I have 150-grit in the picture, but actually have a wide variety within arm's reach.  I buy the small squares intended for hand-held sanders because they're a convenient size (and because they fit my rarely-used sander in my garage).
I didn't intend to write a "how to assemble" blog, but I know that it can be intimidating to jump in ... this video provided by Flying Frog is a decent look at how to use the basic tools and actually shows the basics of sprue clipping and gluing.


II.  Intermediate Tools

Intermediate Tools, more specialized for miniature modeling

Beyond the bare-bones basics, there are all kinds of things that can be used for our hobby.  These are some ideas, but your exact list is going to depend on what areas of the hobby you intend to explore.  The sky is truly the limit here, but some of the most common tools on the bench are:
  • Cutting Mat. Alvin offers many sizes. My new 18x36" version is the backdrop of these pictures.
  • Citadel Moldline Scraper.  The back of a Hobby Knife works pretty well, but I've found this custom-made tool to be worth the investment for large areas and curved surfaces.  The more I use it, the more I like it.
  • Pin Drill.  I'm showing ArmyPainter in the picture, but there are several on the market.  Generally used for adding magnets and metal reinforcing pins (aka "pinning"), I've also used mine to vacate little details that get filled with glue during assembly.
  • Dental tools.  The set I got on Amazon was inexpensive, and is labeled a "Wax Carver" but as a wide selection of picks, scrapers, and spoon-shaped tools.  Useful if you are using Green Stuff (or other hobby putty) to fill gaps or augment bases.   
  • Rubber Tipped Carving Tools.  I use these more than the metal tools.  Something like this set from Amazon will work well.
  • Tweezers
  • Dremel Multi-Tool.  I don't use my Dremel often, but when it's necessary to grind, shape, or cut - the Dremel is the powered tool of choice.  The best example I can give is that the one of the Shadows of Brimstone models had a mis-cast head - too much plastic where the head attached to the shoulders.  A ball-end grinding bit in my Dremel on low speed allowed me to hollow the brain cavity out so that the head sat flush.  Doing this by hand would have been messy and time consuming.
That's it for now, watch for Part II - Painting Basics.